TikTok hiện là mạng xã hội video có lượng tăng trưởng người dùng nhanh nhât thế giới hiện nay. Rất nhiều trao lưu mới của giới trẻ Việt đều xuất phát từ TikTok.
Nhưng hiện tại, nền tảng mạng xã hội này mới chỉ xuất hiện trên mobile (Android & iOS), nếu bạn muốn tạo một widget hiển thị các trending video lên website thì sao? Hoặc tạo một trang video đơn giản để tổng hợp viral video từ TikTok nữa? Bạn hoàn toàn có thể làm được điều đó.
Bài viết này, chúng ta sẽ cùng nhau tạo một trang viral video nhờ sử dụng TikTok API.
Trình tự thực hiện gồm 5 bước:
- Đăng ký lấy API Key miễn phí.
- Lựa chọn Subscribe một TikTok phù hợp.
- Tạo một output template.
- Kết nối tới API bằng JS.
- Hiển thị video lên website.
Chúng ta cùng nhau bắt tay vào thực hiện nhé!
Nội dung chính của bài viết
Bước 1: Đăng ký lấy API Key
Có một dịch vụ trung gian cung cấp nhiều API hay, đó là trang RapidAPI.com.
Trang này giống nhưng một sàn thương mại điện tử. Chỉ khác ở chỗ sản phẩm là những APIs mà thôi. Trang website sẽ kết nối giữa người cung cấp API với người sử dụng API. Có nhiều API free và cả API paid nữa.
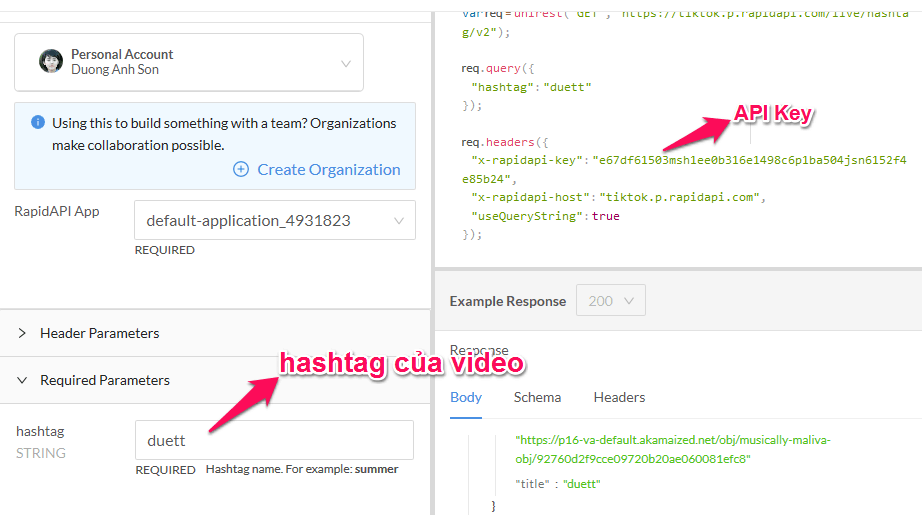
Bạn chỉ cần đăng ký một tài khoản miễn phí trên RapidAPI.com là sẽ được cung cấp một API key để sử dụng cho tất cả API được cung cấp trên website.
Bước 2: Lựa chọn và Subscribe một TikTok API
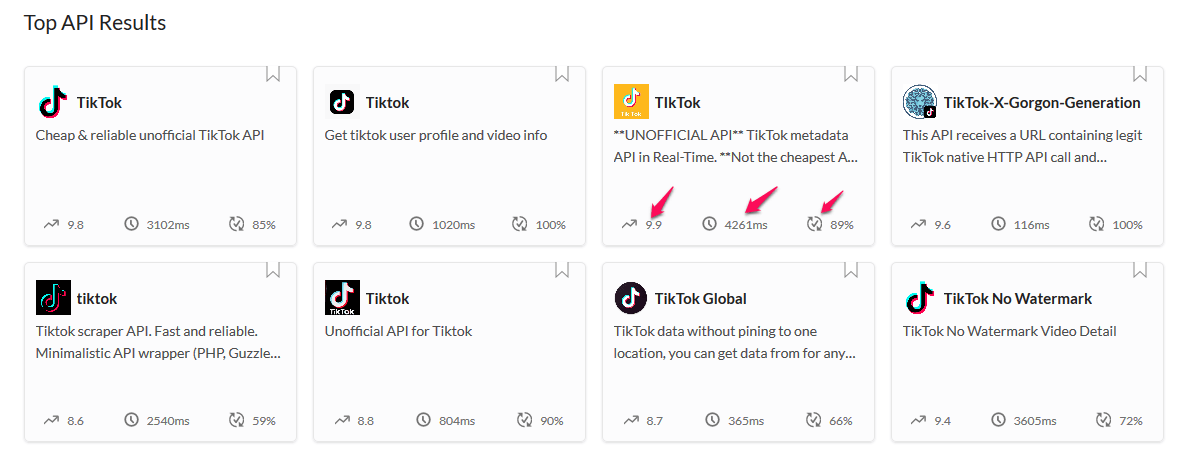
Có rất nhiều APIs liên quan tới TikTok được cung cấp trên RapicAPI, bạn tha hồ lựa chọn. Bạn gõ từ khóa “TikTok” trong ô tìm kiếm để lựa chọn API thích hợp. Kết quả mình tìm kiếm với từ khóa “TikTok” như bên dưới đây:

Khi lựa chọn API, bạn cần lưu ý mấy điểm:
- Về chi phí: là API miễn phí hay trả phí. Nếu trả phí thì có đắt không?
- Lựa chọn API có các chỉ số Popularity, Service Level càng cao càng tốt.
Sau khi đã lựa chọn được API ưng ý, bạn có thể dùng thử xem chất lượng như nào (thường là được miễn phí – nhưng tài nguyên sẽ bị hạn chế).
Trong bài viết này, mình lựa chọn TikTok API để làm ví dụ minh họa. Trên trang endpoints, bạn nhìn thấy nút “Subscribe to Test” để chọn subscrible, trước mắt cứ chọn loại miễn phí để test đã.

Bước 3: Tạo một output template
Sau khi chúng ta đã chuẩn bị xong thủ tục để có quyền truy cập vào API. Giờ là lúc chúng ta tạo một template HTML để hiển thị video nhận được từ API.
Trong bài viết này, chúng ta sẽ tạo một layout dạng lưới 3×3 để hiển thị video. Học tập theo trang chủ của TikTok. Đầu tiên, mình sẽ hiển thị danh sách các ảnh cover của video, nếu người dùng click vào ảnh sẽ được chuyển sang hiển thị video.
Để thực hiện công việc chuyển đổi như vậy, chúng ta sẽ đặt mỗi TikTok vào một div riêng. Sau đó sẽ ánh xạ ảnh cover tới video bằng cách sử dụng array.
Dưới đây là mã nguồn của template:
<h1>Viral Videos TikToks</h1>
<div class="flex-grid">
  <div class="cell" onclick="showClip(0);" onmouseleave="showImage(0);"></div>
  <div class="cell" onclick="showClip(1);" onmouseleave="showImage(1);"></div>
  <div class="cell" onclick="showClip(2);" onmouseleave="showImage(2);"></div>
</div>
<div class="flex-grid">
  <div class="cell" onclick="showClip(3);" onmouseleave="showImage(3);"></div>
  <div class="cell" onclick="showClip(4);" onmouseleave="showImage(4);"></div>
  <div class="cell" onclick="showClip(5);" onmouseleave="showImage(5);"></div>
</div>
<div class="flex-grid">
  <div class="cell" onclick="showClip(6);" onmouseleave="showImage(6);"></div>
  <div class="cell" onclick="showClip(7);" onmouseleave="showImage(7);"></div>
  <div class="cell" onclick="showClip(8);" onmouseleave="showImage(8);"></div>
</div>
Sau đó thêm một chút CSS cho nó màu mè.
<style>
.flex-grid {
  display: flex;
}
.cell {
  flex: 1;
  cursor: pointer;
  padding:1px;
}
.cellContent {
    width: 100%;
    height: 100%;
}
@media (max-width: 400px) {
  .flex-grid {
    display: block;
  }
}
</style>
Bước 4: Kết nối API sử dụng Ajax
Việc kết nối tới API cực đơn giản, ngay trên trang hướng dẫn của RapidAPI cũng có sẵn code rồi, bạn chỉ việc copy là dùng được.
Như bài này, chúng ta đang tạo trang web nên sẽ chọn Jquery để kết nối API.
const settings = {
  "async": true,
  "crossDomain": true,
  "url": "https://tiktok.p.rapidapi.com/live/hashtag/v2?hashtag=duett",
  "method": "GET",
  "headers": {
    "x-rapidapi-key": "e67df61503msh1ee0b316e1498c6p1ba504jsn6152f4e85b24",
    "x-rapidapi-host": "tiktok.p.rapidapi.com"
  }
};

$.ajax(settings).done(function (response) {
  console.log(response);
});
Để sử dụng được Jquery, các bạn nhớ import thư viện vào template đã tạo ở bước 3 nhé.

Bước 5: Hiển thị video lên trang web
Để cải thiện tốc độ tải trang, bạn nên giới hạn tần số refesh trang web. Trong ví dụ này, mình đặt giới hạn là 1 giờ.
Để làm được điều này, chúng ta sẽ lưu response từ TikTok API vào một một tệp JSON. Sau đó, mỗi lần load trang, chúng ta sẽ kiểm tra thời gian cập nhập lần cuối được thêm vào file JSON này.
Nếu thời gian cập nhập lớn 1 giờ, chúng ta sẽ sử dụng API để làm mới data – đừng quên cập nhận response ngược lại vào file JSON để dùng cho lần kiểm tra sau.
<?php
/*
File: updateJSON.php
Description: This file updates the local copy of a feed of TikToks from one hashtag.
  The data is passed in as an object, but it is stored as a JSON formatted string.
  NOTE: no validation is done for this data.  To prevent unauthorized access place
  this file outside of the web root.
Input:
  $_POST - this contains the data passed in object format
*/

//Grab the data passed into this file
if (!empty($_POST)) {
  $latestTikToks = json_encode($_POST);
}

//Update the local file with the latest TikToks in JSON format
file_put_contents(__DIR__."/latestTikToks.json",$latestTikToks);
?>
Còn đây là tệp PHP chính (main.php), nơi mà chúng ta tạo request tới API, lưu responce vào JSON file và hiển thị.
<?php
/*
File: main.php
Description: This page shows a feed of TikToks from one hashtag.
  They are static images but when you click each image
  it is replaced by a video clip (dynamic image).  The JSON file
  is placed one level higher up to keep it out of the webroot.
*/

//First get the current json data from a local file
$latestTikToks='';
if (file_exists(__DIR__."/../latestTikToks.json")) {
  $latestTikToks = file_get_contents(__DIR__."/../latestTikToks.json");
}
$numberOfTikToksToShow = 9;
$numberOfTikTokRowsToShow = $numberOfTikToksToShow/3;
?>
<!DOCTYPE html>
<html>
<head>
<title>TikTok Feed</title>
<style>
.flex-grid {
  display: flex;
}
.cell {
  flex: 1;
  cursor: pointer;
  padding:1px;
}
.cellContent {
    width: 100%;
    height: 100%;
}
@media (max-width: 400px) {
  .flex-grid {
    display: block;
  }
}
</style>
<script src="https://ajax.googleapis.com/ajax/libs/jquery/3.4.1/jquery.min.js"></script>
<script type="text/javascript">
<?php
//Populate a javascript parameter with the latest json data
if (!empty($latestTikToks)) {
  echo "var latestTikToks = ".$latestTikToks."; \n";
} else {
  echo "var latestTikToks = {};\n";
}
?>

//Check last Modified date to see if we need to refresh the data - refresh after an hour
var nowMilliseconds = Date.now();
var nowSeconds = Math.floor(nowMilliseconds / 1000);
var oneHourAgoSeconds = nowSeconds - 3600;

//Define arrays to store static and dynamic images
var images = [];
var clips = [];

//Only do this after the page is loaded so we have elements to populate
$( document ).ready(function() {
  //Decide if we need to call the API or just pull data from the server
  if (latestTikToks.hasOwnProperty('modifiedDateSeconds') && latestTikToks.modifiedDateSeconds>oneHourAgoSeconds) {
    populateTikToks();
  } else {
    console.log("Retrieving TikToks now");
    refreshTikToks();
  }
});

//Use the javascript interface to pull TikToks
function refreshTikToks() {
  var settings = {
    "async": true,
    "crossDomain": true,
    "url": "https://tiktok.p.rapidapi.com/live/hashtag/feed?name=phrog",
    "method": "GET",
    "headers": {
      "x-rapidapi-host": "tiktok.p.rapidapi.com",
      "x-rapidapi-key": "Your-RapidAPI-Key-Here"
    }
  }

  $.ajax(settings).done(function (response) {
    //Save the API response to the server
    saveTikToks(response);
  });
}

//Save the latest tiktok feed to the server
function saveTikToks(jsonFeed) {
  var thisData = jsonFeed;

  //Capture the timestamp within the JSON file
  thisData.modifiedDateSeconds = nowSeconds;

  //Limit how much data is sent to server
  thisData.media = thisData.media.slice(0,10);

  //Update this parameter to use later for populating the page
  latestTikToks = thisData;

  //Send the updated json to the server to save it
  $.ajax({
      type: "POST",
      url: "../updateJSON.php",
      data: thisData,
  }).done(function( results ) {
    console.log(results);
  });

  //Show the latest TikToks on the page
  populateTikToks();
}

//Populate the 9 latest TikToks on the page, and update the arrays of images and clips
function populateTikToks() {
  //Loop through the media property of latestTikToks
  for (var i in latestTikToks.media) {
    //Only populate the number of tiktoks we saved
    if (i>=<?php echo $numberOfTikToksToShow; ?>) break;

    //First update the local arrays of images and clips
    images[i] = latestTikToks.media[i].video.cover;
    clips[i] = latestTikToks.media[i].video.dynamicCover;

    //Next show the image
    showImage(i);
  }
}

//Replace an image with a video clip
function showClip(cellIndex) {
  var outerDiv = document.getElementsByClassName('cell')[cellIndex];
  outerDiv.innerHTML = "<img class='cellContent' src='"+clips[cellIndex]+"'/>'";
}

//Replace a video clip with an image
function showImage(cellIndex) {
  var outerDiv = document.getElementsByClassName('cell')[cellIndex];
  outerDiv.innerHTML = "<img class='cellContent' src='"+images[cellIndex]+"'/>'";
}
</script>
</head>
<body>
  <h1> Phrog TikToks </h1>
  <?php
  //Show 9 tiktoks on the page at once
  for ($i=0;$i<$numberOfTikTokRowsToShow;$i++) {
    ?>
    <div class="flex-grid">
      <div class="cell" onclick="showClip(<?php echo ($i*3); ?>);" onmouseleave="showImage(<?php echo ($i*3); ?>);"></div>
      <div class="cell" onclick="showClip(<?php echo ($i*3)+1; ?>);" onmouseleave="showImage(<?php echo ($i*3)+1; ?>);"></div>
      <div class="cell" onclick="showClip(<?php echo ($i*3)+2; ?>);" onmouseleave="showImage(<?php echo ($i*3)+2; ?>);"></div>
    </div>
    <?php
  } ?>
</body>
</html>
Vậy là xong rồi đấy. Các bạn quăng file main.php lên bất kỳ hosting nào hỗ trợ PHP là chạy được.
Tạm kết
Như vậy, qua bài viết này, chúng ta đã biết cách hiển thị danh sách video TikTok lên website. Đây là chỉ ví dụ minh họa thôi, còn nhiều API hay ho khác nữa. như tải video TikTok xóa watermark, các bạn thử nhé.
😉 Đọc thêm:


nếu đc bạn có thể cho mình xinh link githud hay cái gì đó liên quan đến bài này hong, tại mình làm theo hướng dẫn nhưng mình hơi không hiểu cách chạy nó á
bài viết này có vẻ chưa phù hợp với người mới
quảng cáo bán api là chính mà bạn 😀
Đâu có, bên mình đâu có bán API đâu bạn. Mình thấy hay thì giới thiệu với mọi người thôi, Có thể ai đó muốn đi tắt đón đầu, cần API có sẵn