

Ở phần trước, chúng ta đã cùng nhau đăng kí ứng dụng với Google Drive để có thể tích hợp Google Drive SDK. Phần 2 của series hướng dẫn tích hợp Google Drive SDK, chúng ta sẽ tiến hành code để ứng dụng có thể thực hiện những tính năng cơ bản như: Hiển thị file, download file từ tài khoản Google drive của người dùng.
Các bạn sử dụng lại source code ở phần 1 nhé.
Nào, chúng ta bắt đầu thôi!

Nội dung chính của bài viết
Hướng dẫn tích hợp Google Drive SDK vào ứng dụng
#1. Cập nhật lại tệp Gradle
Trước tiên, bạn cần sửa lại build.gradle trong thư mục app. Thêm hai biến version cho Google Play services và Android support libraries.
ext {
  play_services_version = "15.0.1"
  support_version = "27.1.1"
}
Điều này sẽ cho phép bạn tái sử dụng các biến và thay đổi các phiên bản thư viện một cách dễ dàng. Thay thế phiên bản của com.android.support:appcompat-v7bằng biến đã khai báo ở trên. Tiện thể thì thêm luôn thư viên hỗ trợ design. Các bạn sửa trong block dependencies
implementation "com.android.support:appcompat-v7:$support_version"
implementation "com.android.support:design:$support_version"
Thư viện appcombat giúp ứng dụng có thể hỗ trợ tốt các Android OS phiên bản cũ.
Còn thư viện support:design được sử dụng trong ví dụ này là tạo Snackbar( Nó cũng chỉ là một dạng thông báo như Toast thôi, nhưng nó hiện đại hơn)
Tiếp theo, thêm thư viện Google Drive SDK và thư viện Okio để hỗ trợ cho tính năng tải file từ tài khoản Google Drive của người dùng
// Google Drive
implementation "com.google.android.gms:play-services-auth:$play_services_version"
implementation "com.google.android.gms:play-services-drive:$play_services_version"
implementation 'com.squareup.okio:okio:1.14.0'
OK, sau khi đã thêm đầy đủ thư viện cần thiết thì nhấn nút Sync(File ▸ Sync Project with Gradle Files ) để Android Studio tải thư viện về.
#2. Chỉnh sửa Android Manifest
Tiếp theo, bạn cần chỉnh sửa AndroidManifest.xml.
Đầu tiên là thêm quyền truy cập vào Internet
<uses-permission android:name="android.permission.INTERNET"/>
Sau đó là chỉ định phiên bản Google Play Services
<meta-data
    android:name="com.google.android.gms.version"
    android:value="@integer/google_play_services_version" />
#3. Tạo một File Provider
Tiếp theo, bạn sẽ tạo một file Provider. Yêu cầu là Android 8.0 Oreo hoặc cao hơn để có thể xử lý các file trong local storage của điện thoại
Trước tiên, tạo một thư mục mới bằng cách click chuột phải vào thư mục app/res và chọn New ▸ Android Resource Directory. Đặt tên nó là xml. Click chuột phải vào thư mục xml và chọn New ▸ File; đặt tên là provider_paths.
Cách làm này thực chất là một tip trick thôi vì Android Oreo không hổ trợ chia sẽ kiểu file:// urls.
<?xml version="1.0" encoding="utf-8"?>
<paths xmlns:android="http://schemas.android.com/apk/res/android">
   <external-path name="external_files" path="."/>
</paths>
Quay trở lại Android Manifest, bạn thêm đoạn mã dưới vào sau thẻ meta-data
<provider
  android:name="android.support.v4.content.FileProvider"
  android:authorities="${applicationId}.provider"
  android:exported="false"
  android:grantUriPermissions="true">
  <meta-data
    android:name="android.support.FILE_PROVIDER_PATHS"
    android:resource="@xml/provider_paths"/>
Mục đích là để ứng dụng có thể sử dụng class FileProvider của Android để xử lý các local file dưới dạng url thay vì dưới dạng các file. Chắc vì lý do bảo mật nên từ Android 8 Google mới bắt làm vậy
#4. Định nghĩa các String
Mở file strings.xml và thêm vào đoạn code sau:
<string name="source_google_drive">Google Drive</string>
<string name="start_drive">Start Google Drive</string>
<string name="login">Log In</string>
<string name="logout">Log Out</string>
<string name="status_logged_out">Logged Out</string>
<string name="status_logged_in">Logged In</string>
<string name="status_user_cancelled">User Cancelled</string>
<string name="status_error">We found a problem: %1$s</string>
<string name="not_open_file">Could not open file</string>
Ở đây, việc đặt tên các String cũng nên theo một chuẩn để bạn dễ mở rộng sau này. Các bạn tham khảo bài viết: Quy tắc đặt tên chuẩn cho Android Resource
#5. Thiết kế giao diện ứng dụng
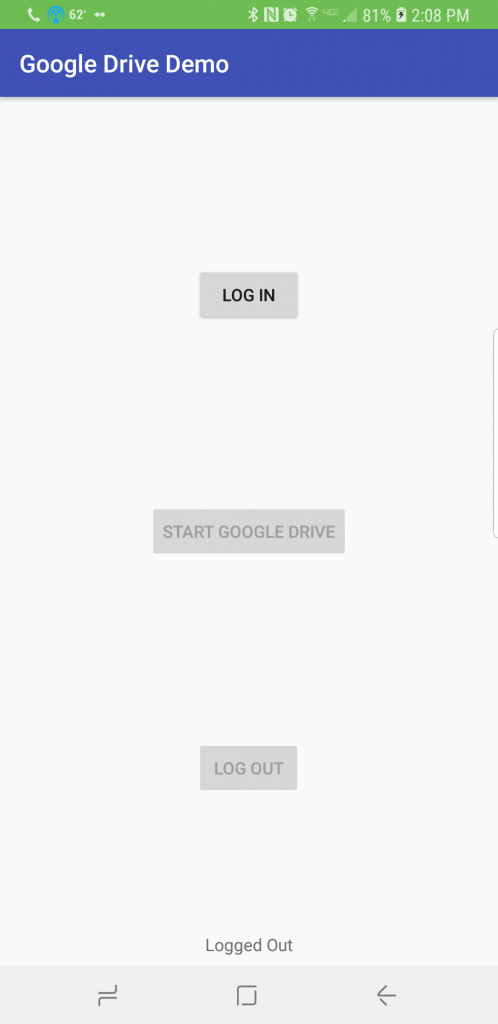
Giao diện ứng dụng rất đơn giản. Ứng dụng có 3 Button chính: Login, Logout và Open Google Drive và một TextView để hiển thị trạng thái đăng nhập.
Mở activity_main.xml thay thế nội dung bằng đoạn code bên dưới:
<?xml version="1.0" encoding="utf-8"?>
<android.support.constraint.ConstraintLayout xmlns:android="http://schemas.android.com/apk/res/android"
  xmlns:app="http://schemas.android.com/apk/res-auto"
  xmlns:tools="http://schemas.android.com/tools"
  android:id="@+id/main_layout"
  android:layout_width="match_parent"
  android:layout_height="match_parent"
  tools:context=".MainActivity">

  <Button
    android:id="@+id/login"
    android:layout_width="wrap_content"
    android:layout_height="wrap_content"
    android:text="@string/login"
    app:layout_constraintBottom_toTopOf="@+id/start"
    app:layout_constraintEnd_toEndOf="parent"
    app:layout_constraintHorizontal_bias="0.5"
    app:layout_constraintStart_toStartOf="parent"
    app:layout_constraintTop_toTopOf="parent" />

  <Button
    android:id="@+id/start"
    android:layout_width="wrap_content"
    android:layout_height="wrap_content"
    android:text="@string/start_drive"
    app:layout_constraintBottom_toTopOf="@+id/logout"
    app:layout_constraintEnd_toEndOf="parent"
    app:layout_constraintHorizontal_bias="0.5"
    app:layout_constraintStart_toStartOf="parent"
    app:layout_constraintTop_toBottomOf="@+id/login" />

  <Button
    android:id="@+id/logout"
    android:layout_width="wrap_content"
    android:layout_height="wrap_content"
    android:text="@string/logout"
    app:layout_constraintBottom_toBottomOf="parent"
    app:layout_constraintEnd_toEndOf="parent"
    app:layout_constraintHorizontal_bias="0.5"
    app:layout_constraintStart_toStartOf="parent"
    app:layout_constraintTop_toBottomOf="@+id/start" />

  <TextView
    android:id="@+id/status"
    android:layout_width="0dp"
    android:layout_height="wrap_content"
    android:layout_marginBottom="8dp"
    android:gravity="center_horizontal"
    android:text="@string/status_logged_out"
    app:layout_constraintBottom_toBottomOf="parent"
    app:layout_constraintEnd_toEndOf="parent"
    app:layout_constraintStart_toStartOf="parent" />
</android.support.constraint.ConstraintLayout>
Chạy thử ứng dụng xem giao diện có được như bên dưới không nhé
#6. Tạo ServiceListener Interface
Bởi vì ứng dụng này cũng không có nhiều class lắm nên mình không có phân chia ra làm nhiều folder source. Tất cả sẽ được đặt vào cùng 1 folder cho nó nhanh
Tạo một interface với tên là ServiceListener:
interface ServiceListener {
  fun loggedIn() //1
  fun fileDownloaded(file: File) //2
  fun cancelled() //3
  fun handleError(exception: Exception) //4
}
Bạn có thể chọn Option+Return trên macOS hoặc Alt+Enter trên PC để import các thư viện cần thiết.
Mình giải thích qua về các hàm ở trên:
loggedIn(): Người dùng đã được xác thực thành công và ở trạng thái loginedfileDownloaded(file: File):Một file được chọn và tải xuống thành công.cancelled(): Phiên đăng nhập hoặc lựa chọn tệp bị hủy.handleError(exception: Exception): Có bất cứ lỗi nào.
Interface này sẽ được implement bởi MainActivity.
#7. Tạo một Data class: GoogleDriveConfig
Tiếp theo, tạo một class dữ liệu đơn giản để giữ thông tin cần thiết. Tạo một class dữ liệu đặt tên là GoogleDriveConfig:
data class GoogleDriveConfig(val activityTitle: String? = null,
    val mimeTypes: List<String>? = null)
Class này chứa tiêu đề mà Google Drive sẽ chỉ định làm tiêu đề của các Activity và mimeTypes để xác định loại file nào sẽ hiển thị.
#8. Tạo GoogleDriveService
Tiếp theo, bạn sẽ tạo một service. Đơn giản là tạo một class với tên gọi là GoogleDriveService:
class GoogleDriveService(private val activity: Activity,
     private val config: GoogleDriveConfig) {
}
Class này không phải là một Android Service vì nó không có kế thừa từ Service class. nó sẽ hoạt động như một service cho MainActivity.
- Bạn có thể tìm hiểu kỹ hơn về Android Service tại đây: Service trong Android là gì?
Trước tiên, thêm một Companion Object (Companion Object là đối tượng có tên trùng với tên class)
companion object {
  private val SCOPES = setOf<Scope>(Drive.SCOPE_FILE, Drive.SCOPE_APPFOLDER)
  val documentMimeTypes = arrayListOf(
      "application/pdf",
      "application/msword",
      "application/vnd.openxmlformats-officedocument.wordprocessingml.document")

  const val REQUEST_CODE_OPEN_ITEM = 100
  const val REQUEST_CODE_SIGN_IN = 101
  const val TAG = "GoogleDriveService"
}
Scopes là một bộ phân quyền của Google Drive. Hiểu đơn giản là ứng dụng của bạn phải khai báo với Google Drive phạm vi (folder hay file nào trong tài khoản người dùng) ứng dụng của bạn có thể xử lý.
mimeTypes là các loại file mà bạn muốn cho phép người dùng chọn. Nếu bạn muốn người dùng chọn các hình ảnh, bạn sử dụng image/*. Còn các file văn bản thì có thể là .pdf và .doc/.docx.
Sau section companion object, thêm các biến sau:
var serviceListener: ServiceListener? = null //1
private var driveClient: DriveClient? = null //2
private var driveResourceClient: DriveResourceClient? = null //3
private var signInAccount: GoogleSignInAccount? = null //4
Trong đó:
- serviceListener là listener của service.
- driveClient – level API để tạo file, mở file, hay đồng bộ.
- driveResourceClient xử lý quyền truy cập tới các nguồn như Drive và/hoặc các file.
- signInAccount theo dõi tài khoản vừa mới đăng nhập.
Bây giờ thêm thuộc tính GoogleSignInClient (thuộc tính lazily-initialized):
private val googleSignInClient: GoogleSignInClient by lazy {
  val builder = GoogleSignInOptions.Builder(GoogleSignInOptions.DEFAULT_SIGN_IN)
  for (scope in SCOPES) {
    builder.requestScopes(scope)
  }
  val signInOptions = builder.build()
  GoogleSignIn.getClient(activity, signInOptions)
}
googleSignInClient được tạo khi cần và bao gồm cả phạm vi được định nghĩa từ ở trên. Câu lệnh cuối trả về một GoogleSignInClient.
#9. Xử lý các kết quả trả về trong Activity
Bạn cần cho phép xử lý các kết quả từ người dùng như chọn file, mở file hay download file...
Chúng ta override hàm onActivityResult() trong MainActivity:
fun onActivityResult(requestCode: Int, resultCode: Int, data: Intent?) {
  when (requestCode) {
    REQUEST_CODE_SIGN_IN -> {
      if (data != null) {
        handleSignIn(data)
      } else {
        serviceListener?.cancelled()
      }
    }

    REQUEST_CODE_OPEN_ITEM -> {
      if (data != null) {
        openItem(data)
      } else {
        serviceListener?.cancelled()
      }
    }
  }
}
Trong hàm này, bạn gọi các hàm helper hoặc serviceListener tùy thuộc vào requestCode. Nếu không có dữ liệu trả về, có nghĩa là người dùng đã hủy hành động đó.
Bây giờ thêm hàm helper để xử lý đăng nhập
private fun handleSignIn(data: Intent) {
  val getAccountTask = GoogleSignIn.getSignedInAccountFromIntent(data)
  if (getAccountTask.isSuccessful) {
    initializeDriveClient(getAccountTask.result)
  } else {
    serviceListener?.handleError(Exception("Sign-in failed.", getAccountTask.exception))
  }
}

private fun initializeDriveClient(signInAccount: GoogleSignInAccount) {
  driveClient = Drive.getDriveClient(activity.applicationContext, signInAccount)
  driveResourceClient = Drive.getDriveResourceClient(activity.applicationContext, signInAccount)
  serviceListener?.loggedIn()
}
Một khi người dùng đã đăng nhập, bạn sẽ xử lý kết quả trong hàm initializeDriveClient(). Điều này sẽ tạo ra các drive client cho bạn. Và chúng sẽ thông báo cho listener rằng người dùng đã đăng nhập thành công
Sau khi người dùng đã chọn file, bạn sẽ nhận được một intent và chuyển nó tới openItem(). Vì vậy hãy thêm hàm helper sau
private fun openItem(data: Intent) {
  val driveId = data.getParcelableExtra<DriveId>(OpenFileActivityOptions.EXTRA_RESPONSE_DRIVE_ID)
  downloadFile(driveId)
}
Hàm này sẽ lấy driveId từ các intent và truyền ID đó đến hàm helper khác như downloadFile().
Để download một file, bạn cần lấy Input stream và lưu nó lại thành file ở điện thoại. Chúng ta sẽ sử dụng thư viện Square’s Okio để dễ dàng lấy Input stream và lưu thành một file.
Thêm hàm downloadFile():
private fun downloadFile(data: DriveId?) {
  if (data == null) {
    Log.e(TAG, "downloadFile data is null")
    return
  }
  val drive = data.asDriveFile()
  var fileName = "test"
  driveResourceClient?.getMetadata(drive)?.addOnSuccessListener {
    fileName = it.originalFilename
  }
  val openFileTask = driveResourceClient?.openFile(drive, DriveFile.MODE_READ_ONLY)
  openFileTask?.continueWithTask { task ->
    val contents = task.result
    contents.inputStream.use {
      try {
        //This is the app's download directory, not the phones
        val storageDir = activity.getExternalFilesDir(Environment.DIRECTORY_DOWNLOADS)
        val tempFile = File(storageDir, fileName)
        tempFile.createNewFile()
        val sink = Okio.buffer(Okio.sink(tempFile))
        sink.writeAll(Okio.source(it))
        sink.close()

        serviceListener?.fileDownloaded(tempFile)
      } catch (e: IOException) {
        Log.e(TAG, "Problems saving file", e)
        serviceListener?.handleError(e)
      }
    }
    driveResourceClient?.discardContents(contents)
  }?.addOnFailureListener { e ->
    // Handle failure
    Log.e(TAG, "Unable to read contents", e)
    serviceListener?.handleError(e)
  }
}
Chú ý lệnh getMetaData(). Mục đích là sau khi download xong một file thì ứng dụng có thông tin của file đã được lưu trong điện thoại để thông báo cho người biết file đó.
Chúng ta tạm kết thúc phần 2 của series: Hướng dẫn tích hợp Google Drive SDK vào ứng dụng Android. Phần tiếp theo, chúng ta sẽ hoàn thiện ứng dụng như: cập nhập giao diện ứng dụng khi người dùng đăng nhập/đăng xuất, xử lý nốt phần tải tệp từ tài khoản google drive về điện thoại. Các bạn đón đọc nhé
Đừng quên comment và chia sẻ để mình có động lực hoàn thành series nhé


 tốt nhất 2023")


Bình luận. Cùng nhau thảo luận nhé!