Hầu hết hệ thống ứng dụng back-end, tính năng xác thực và phân quyền người dùng đều phải có. Ví dụ, khi tạo một website, đương nhiên bạn cần phải xây dựng tính năng đăng ký, đăng nhập, phân quyền admin, mod, member… Có một một số kỹ thuật giúp bạn xây dựng tính năng này, ví dụ: dùng Sessions, hoặc mới hơn là JWT.
Qua bài viết này, chúng ta sẽ cùng nhau xây dựng một ví dụ ứng dụng Node.js + MongoDB hỗ trợ tính năng User Authentication (đăng ký, đăng nhập) và Authorization bằng JSONWebToken (JWT).
Bài viết được tham khảo và dịch từ: https://bezkoder.com/node-js-mongodb-auth-jwt/
Nội dung chính bài viết:
- Tìm hiểu flow thích hợp cho thành viên đăng ký và đăng nhập
- Kiến trúc Node.js + Express với CORS, Authenticaton và Authorization middlewares, Mongoose ODM
- Thiết kế route hoạt động phù hợp với JWT
- Định nghĩa Mongoose Models cho Authentication và Authorization
- Cách sử dụng Mongoose tương tác với CSDL MongoDB.
Trước khi chúng ta bắt tay vào thực hành viết code, mình muốn giải thích qua một số lý thuyết cần thiết để bạn hiểu bài viết tốt hơn.
Nội dung chính của bài viết
- #1- Sự khác nhau “Authentication” và “Authorization”
- #2- Token Based Authentication
- #3- Thực hành Node.js & MongoDB User Authentication
- #4- Flow chương trình cho tính năng Signup & Login
- #5- Node.js Express Architecture cho Authentication & Authorization
- #6- Cấu trúc thư mục dự án
- #7- Tạo dự án NodeJS
- #8- Thiết lập Express web server
- #9- Cấu hình kết nối MongoDB
- #10- Định nghĩa Mongoose Model
- #11- Khởi tạo Mongoose
- #12- Cấu hình Auth Key
- #13- Tạo các hàm middleware
- #14- Tạo Controllers
- #15- Định nghĩa Routes
- #16- Run & Test chương trình
Nghe hai thuật ngữ này có vẻ giống nhau đúng không? Tuy nhiên, chúng hơi khác một chút. Mình sẽ không đi sâu vào chi tiết hoạt động của chúng. Phần này, mình chỉ muốn làm nổi bật đặc điểm để bạn phân biệt Authentication và Authorization.
1-1. Authentication
Authentication là quá trình hệ thống kiểm tra, xác định danh tính của người dùng hoặc một hệ thống khác đang truy cập vào hệ thống hiện tại.
Hiểu nôm na, quá trình Authentication đi tìm câu trả lời cho câu hỏi: “Bạn là ai?”
Quá trình Authentication rất thông dụng, hầu hết các CMS liên quan tới quản lý nội dung, tương tác với người dùng đều có. Hiện nay, authentication xác thực chủ yếu dựa trên hai thông tin: tên người dùng và mật khẩu.
Tương tự, quá trình authorization để trả lời cho câu hỏi: “Bạn được phép làm gì?“.
Về mặt kỹ thuật, quá trình authorization thường được thực hiện sau khi quá trình authentication kết thức. Tức là, sau khi biết bạn là ai rồi thì bước tiếp theo xác định bạn được phép làm gì trong hệ thống.
#2- Token Based Authentication
So với kỹ thuật xác thực dựa trên Session, bạn cần phải lưu Session vào Cookie. Lợi thế lớn nhất của Token-base authentication là lưu JSON Web Token (JWT) trên client như: Local Storage trên Browser, Keychain trong iOS app hay SharedPreferences trong ứng dụng Android, .v.v…
Vì vậy, chúng ta không cần phải xây dựng một dự án vệ tinh hoặc một module xác thực bổ sung để hỗ trợ cho ứng dụng không dùng trên trình duyệt (ví dụ như các ứng dụng mobile Android, iOS…)
Dưới đây là sơ đồ luồng hoạt động của JWT.
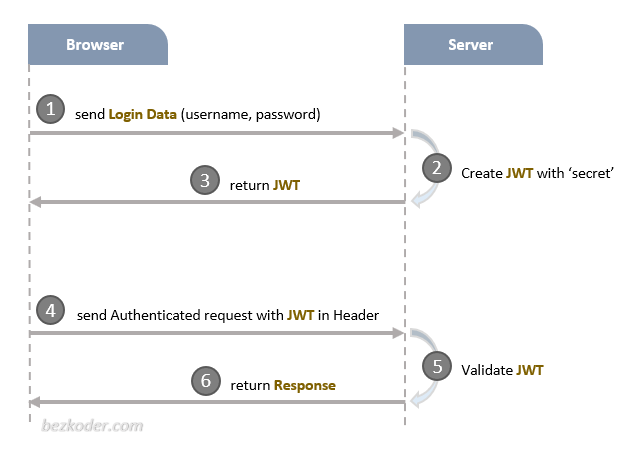
Có 3 thành phần quan trọng của JWT:
- Header
- Payload
- Signature
Chúng được kết hợp với nhau tạo thành một cấu trúc tiêu chuẩn: header.payload.signature
Ứng dụng Client thường đính kèm mã JWT vào header với tiền tố Bearer:
Authorization: Bearer [header].[payload].[signature]
Hoặc chỉ cần thêm một trường x-access-token trong header
x-access-token: [header].[payload].[signature]
#3- Thực hành Node.js & MongoDB User Authentication
Sau khi tìm hiểu xong lý thuyết, giờ là lúc bắt tay vào thực hành. Chúng ta sẽ xây dựng một ứng dụng Node.js + Express với tính năng user authentication + authorization, trong đó:
- Người dùng có thể đăng ký tài khoản mới hoặc đăng nhập nếu đã có tài khoản.
- Phân quyền tài khoản người dùng theo role (admin, moderator, user). Với mỗi role, người dùng có quyền khác nhau để truy cập vào tài nguyên.
Đây là danh sách những APIs cần thiết:
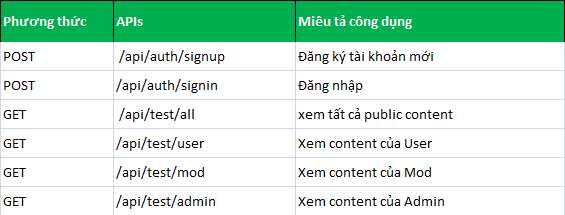
#4- Flow chương trình cho tính năng Signup & Login
Dưới đây là diagram miêu tả quy trình mà ứng dụng Node.js sẽ thực hiện cho các tính năng Authentication (User Registration, User Login) và Authorization (phân quyền).
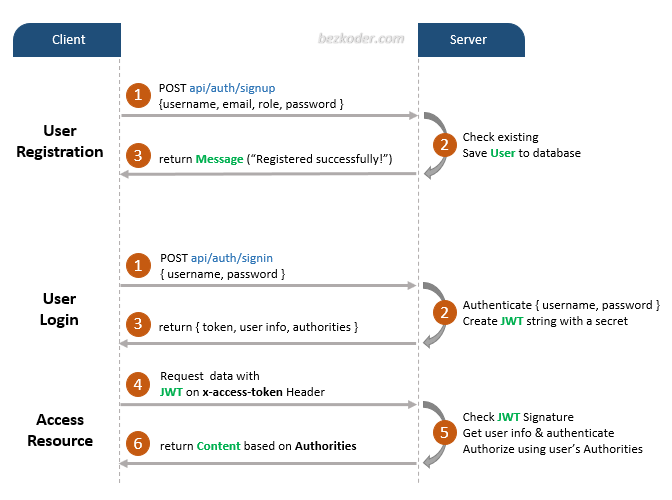
Một JWT hợp lệ để truy cập vào tài nguyên hệ thống phải có trường x-access-token trong Header của HTTP.
Hình dưới đây mô tả tổng quan kiến trúc ứng dụng sử dụng Node.js + Express cho authentication & authorization.
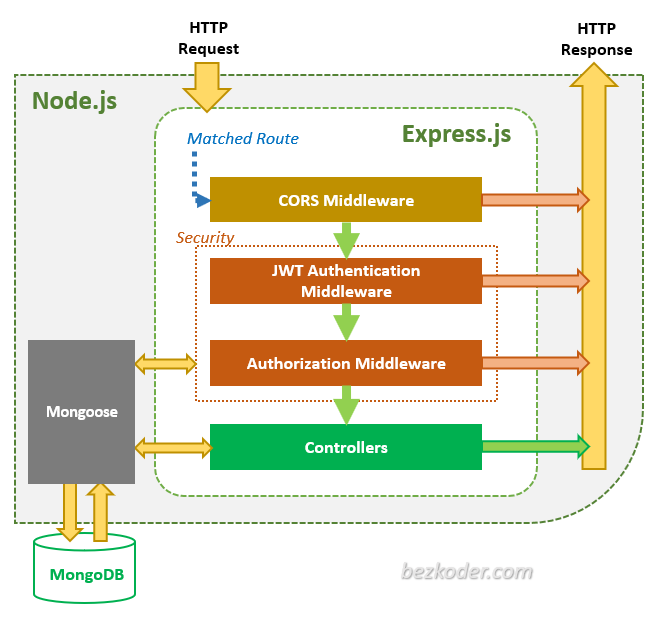
Thông qua Express, các HTTP request hợp lệ và đúng với route đã thiết kế (xem lại bảng 3.1- danh sách các API sử dụng trong app) sẽ được kiểm tra bởi CORS Middleware trước khi vào Security layer.
Security layer bao gồm:
- JWT Authentication Middleware: có nhiệm vụ xác minh SignUp, chuỗi token.
- Authorization Middleware: Kiểm tra role của người dùng đăng nhập với các thông tin được lưu trong cơ sở dữ liệu.
Nếu gặp bất kỳ lỗi nào trong toàn bộ quá trình trên sẽ lập tức phản hồi lại cho client dưới dạng HTTP response (error code).
Các kỹ thuật được sử dụng ví dụ này (phiên bản có thể khác trong tương lai nhưng chắc không vấn đề gì đâu):
- Express 4.17.1
- bcryptjs 2.4.3
- jsonwebtoken 8.5.1
- mongoose 5.9.1
- MongoDB
Yêu cầu môi trường phát triển, bạn cần phải cài đặt trước những phần mềm sau:
- Nodejs: Hướng dẫn cài đặt Node + Npm chi tiết
- MongoDB: đây là phần mềm quản trị cơ sở dữ liệu.
- Tải và cài đặt Visual code hoặc Sublime Text 3: dùng để viết code nhanh hơn
#6- Cấu trúc thư mục dự án
Dưới đây là cấu trúc thư mục mã nguồn của dự án trong bài viết này:

#7- Tạo dự án NodeJS
Để bắt đầu, chúng ta cần tạo mới một dự án NodeJS. Phần này thì mình sẽ không hướng dẫn lại nữa, bạn có thể tham khảo cách làm chi tiết tại đây: Tạo dự án NodeJS
Khi tạo dự án mới xong, bạn cần tạo thêm các thư viện cần thiết: express, cors, body-parser, mongoose, jsonwebtoken và bcryptjs.
Sử dụng npm để cài đặt chúng, gõ lệnh sau:
npm install express mongoose body-parser cors jsonwebtoken bcryptjs --save
Nội dung package.json của dự án như sau:
{
  "name": "authentication-authorization-nodejs-jwt-mongodb",
  "version": "1.0.0",
  "description": "Node.js + MongoDB: JWT Authentication & Authorization",
  "main": "server.js",
  "scripts": {
    "test": "echo \"Error: no test specified\" && exit 1"
  },
  "keywords": [
    "node.js",
    "express",
    "jwt",
    "authentication",
    "mongodb"
  ],
  "author": "bezkoder.com",
  "license": "ISC",
  "dependencies": {
    "bcryptjs": "^2.4.3",
    "body-parser": "^1.19.0",
    "cors": "^2.8.5",
    "express": "^4.17.1",
    "jsonwebtoken": "^8.5.1",
    "mongoose": "^5.9.1"
  }
}
#8- Thiết lập Express web server
Trong thư mục gốc của dự án, tạo thêm tệp server.js có nội dung như sau:
const express = require("express");
const bodyParser = require("body-parser");
const cors = require("cors");

const app = express();

var corsOptions = {
  origin: "http://localhost:8081"
};

app.use(cors(corsOptions));

// parse requests of content-type - application/json
app.use(bodyParser.json());

// parse requests of content-type - application/x-www-form-urlencoded
app.use(bodyParser.urlencoded({ extended: true }));

// simple route
app.get("/", (req, res) => {
  res.json({ message: "Welcome to VNTALKING application." });
});

// set port, listen for requests
const PORT = process.env.PORT || 8080;
app.listen(PORT, () => {
  console.log(Server is running on port ${PORT}.);
});
Mình sẽ giải thích một chút về đoạn code trong server.js:
- Chúng ta import
Expressđể tạo REST API - Thư viện
body-parserđược dùng để parse các request vào body object. - Import thư viện
corscung cấp Express middleware dùng để bật tính năng CORS
Cuối cùng, bạn có thể chạy thử ứng dụng bằng lệnh: npm start
Truy cập vào trình duyệt theo đường dẫn: http://localhost:8080/

#9- Cấu hình kết nối MongoDB
Trong thư mục app, tạo riêng một thư mục mới, đặt tên là config. Thư mục này sẽ chứa tất cả các tệp liên quan tới cấu hình ứng dụng.
Trong thư mục config, bạn tạo tệp db.config.js để thêm các thông tin cài đặt cơ sở dữ liệu MongoDB cho ứng dụng:
module.exports = {
  HOST: "localhost",
  PORT: 27017,
  DB: "vntalking_db"
};
#10- Định nghĩa Mongoose Model
Trong thư mục model, bạn tạo User và Role model như sau:
models/role.model.js
const mongoose = require("mongoose");

const Role = mongoose.model(
  "Role",
  new mongoose.Schema({
    name: String
  })
);

module.exports = Role;
models/user.model.js
const mongoose = require("mongoose");

const User = mongoose.model(
  "User",
  new mongoose.Schema({
    username: String,
    email: String,
    password: String,
    roles: [
      {
        type: mongoose.Schema.Types.ObjectId,
        ref: "Role"
      }
    ]
  })
);

module.exports = User;
Các Mongoose Models này sẽ đại diện cho collection được tạo trong MongoDB. Khi bạn chạy chương trình, Mongoose sẽ tự động tạo hai collections có tên là: users và roles.
Sau khi đã khai báo xong, bạn không cần thiết phải tạo các hàm CRUD (đọc ghi cơ sở dữ liệu) vì Mongoose đã hỗ trợ sẵn rồi. Ví dụ:
- Tạo mới một User: có hàm
object.save() - Tìm một User theo Id: Sử dụng
User.findById(id) - Tìm User theo email:
User.findOne({ email: … }) - Tìm tất cả roles:
Role.find({…})
Những chức năng sẽ được chúng ta sử dụng trong Controllers. Cứ bình tĩnh nhé.
#11- Khởi tạo Mongoose
Bây giờ chúng ta tạo app/models/index.js với nội dung sau:
const mongoose = require('mongoose');
mongoose.Promise = global.Promise;

const db = {};

db.mongoose = mongoose;

db.user = require("./user.model");
db.role = require("./role.model");

db.ROLES = ["user", "admin", "moderator"];

module.exports = db;
Mở lại tệp server.js để thêm đoạn mã sau để mở kết nối Mongoose với cơ sở dữ liệu MongoDB.
...
const app = express();
app.use(...);

const db = require("./app/models");
const Role = db.role;

db.mongoose
  .connect(mongodb://${dbConfig.HOST}:${dbConfig.PORT}/${dbConfig.DB}, {
    useNewUrlParser: true,
    useUnifiedTopology: true
  })
  .then(() => {
    console.log("Successfully connect to MongoDB.");
    initial();
  })
  .catch(err => {
    console.error("Connection error", err);
    process.exit();
  });

...
function initial() {
  Role.estimatedDocumentCount((err, count) => {
    if (!err && count === 0) {
      new Role({
        name: "user"
      }).save(err => {
        if (err) {
          console.log("error", err);
        }

        console.log("added 'user' to roles collection");
      });

      new Role({
        name: "moderator"
      }).save(err => {
        if (err) {
          console.log("error", err);
        }

        console.log("added 'moderator' to roles collection");
      });

      new Role({
        name: "admin"
      }).save(err => {
        if (err) {
          console.log("error", err);
        }

        console.log("added 'admin' to roles collection");
      });
    }
  });
}
Hàm initial() cho phép chúng ta thêm dữ liệu 3 roles vào trong cơ sở dữ liệu, nếu trong DB có rồi thì bỏ qua.
#12- Cấu hình Auth Key
Các hàm jsonwebtoken như: verify(), sign() sẽ cần tới một secret key để encode hay decode chuỗi token.
Trong thư mục app/config, tạo thêm auth.config.js với nội dung sau:
module.exports = {
  secret: "vntalking-secret-key"
};
Trong đó, bạn có thể tạo chuối secret bất kỳ cho riêng bạn.
#13- Tạo các hàm middleware
Quá trình để verify một hành động trong SignUp, chúng ta cần làm 2 việc:
- Kiểm tra xem tên người dùng, email có bị trùng lặp trong DB hay không?
- Kiểm tra xem role đăng ký có hợp lệ hay không?
middlewares/verifySignUp.js
const db = require("../models");
const ROLES = db.ROLES;
const User = db.user;

checkDuplicateUsernameOrEmail = (req, res, next) => {
  // Username
  User.findOne({
    username: req.body.username
  }).exec((err, user) => {
    if (err) {
      res.status(500).send({ message: err });
      return;
    }

    if (user) {
      res.status(400).send({ message: "Failed! Username is already in use!" });
      return;
    }

    // Email
    User.findOne({
      email: req.body.email
    }).exec((err, user) => {
      if (err) {
        res.status(500).send({ message: err });
        return;
      }

      if (user) {
        res.status(400).send({ message: "Failed! Email is already in use!" });
        return;
      }

      next();
    });
  });
};

checkRolesExisted = (req, res, next) => {
  if (req.body.roles) {
    for (let i = 0; i < req.body.roles.length; i++) {
      if (!ROLES.includes(req.body.roles[i])) {
        res.status(400).send({
          message: Failed! Role ${req.body.roles[i]} does not exist!
        });
        return;
      }
    }
  }

  next();
};

const verifySignUp = {
  checkDuplicateUsernameOrEmail,
  checkRolesExisted
};

module.exports = verifySignUp;
Để xử lý việc Authentication & Authorization, chúng ta cần tạo các hàm sau:
- Kiểm tra token có hợp lệ hay không? Chúng ta có thể lấy thông tin token trong trường x-access-token của Header HTTP, sau đó chuyển cho hàm
verify()xử lý. - Kiểm tra role đăng ký đã có role chưa hay là trống?
middlewares/authJwt.js
const jwt = require("jsonwebtoken");
const config = require("../config/auth.config.js");
const db = require("../models");
const User = db.user;
const Role = db.role;

verifyToken = (req, res, next) => {
  let token = req.headers["x-access-token"];

  if (!token) {
    return res.status(403).send({ message: "No token provided!" });
  }

  jwt.verify(token, config.secret, (err, decoded) => {
    if (err) {
      return res.status(401).send({ message: "Unauthorized!" });
    }
    req.userId = decoded.id;
    next();
  });
};

isAdmin = (req, res, next) => {
  User.findById(req.userId).exec((err, user) => {
    if (err) {
      res.status(500).send({ message: err });
      return;
    }

    Role.find(
      {
        _id: { $in: user.roles }
      },
      (err, roles) => {
        if (err) {
          res.status(500).send({ message: err });
          return;
        }

        for (let i = 0; i < roles.length; i++) {
          if (roles[i].name === "admin") {
            next();
            return;
          }
        }

        res.status(403).send({ message: "Require Admin Role!" });
        return;
      }
    );
  });
};

isModerator = (req, res, next) => {
  User.findById(req.userId).exec((err, user) => {
    if (err) {
      res.status(500).send({ message: err });
      return;
    }

    Role.find(
      {
        _id: { $in: user.roles }
      },
      (err, roles) => {
        if (err) {
          res.status(500).send({ message: err });
          return;
        }

        for (let i = 0; i < roles.length; i++) {
          if (roles[i].name === "moderator") {
            next();
            return;
          }
        }

        res.status(403).send({ message: "Require Moderator Role!" });
        return;
      }
    );
  });
};

const authJwt = {
  verifyToken,
  isAdmin,
  isModerator
};
module.exports = authJwt;
Cuối cùng là tạo tệp index.js trong thư mục middlewares để export chúng:
const authJwt = require("./authJwt");
const verifySignUp = require("./verifySignUp");

module.exports = {
  authJwt,
  verifySignUp
};
#14- Tạo Controllers
Chúng ta sẽ lần lượt tạo controller cho 2 phần: Authentication và Authorization.
Controller cho Authentication
Với phần này, chúng ta có 2 công việc chính cho tính năng authentication:
- Đăng ký: tạo người dùng mới và lưu trong cơ sở dữ liệu (với role mặc định là User nếu không chỉ định trước lúc đăng ký).
- Đăng nhập: quá trình đăng nhập gồm 4 bước:
- Tìm username trong cơ sở dữ liệu,
- Nếu username tồn tại, so sánh password với password trong CSDL sử dụng. Nếu password khớp, tạo token bằng jsonwebtoken rồi trả về client với thông tin User kèm access-Token
Nguyên lý chỉ có như vậy, giờ là mã nguồn:
controllers/auth.controller.js
const config = require("../config/auth.config");
const db = require("../models");
const User = db.user;
const Role = db.role;

var jwt = require("jsonwebtoken");
var bcrypt = require("bcryptjs");

exports.signup = (req, res) => {
  const user = new User({
    username: req.body.username,
    email: req.body.email,
    password: bcrypt.hashSync(req.body.password, 8)
  });

  user.save((err, user) => {
    if (err) {
      res.status(500).send({ message: err });
      return;
    }

    if (req.body.roles) {
      Role.find(
        {
          name: { $in: req.body.roles }
        },
        (err, roles) => {
          if (err) {
            res.status(500).send({ message: err });
            return;
          }

          user.roles = roles.map(role => role._id);
          user.save(err => {
            if (err) {
              res.status(500).send({ message: err });
              return;
            }

            res.send({ message: "User was registered successfully!" });
          });
        }
      );
    } else {
      Role.findOne({ name: "user" }, (err, role) => {
        if (err) {
          res.status(500).send({ message: err });
          return;
        }

        user.roles = [role._id];
        user.save(err => {
          if (err) {
            res.status(500).send({ message: err });
            return;
          }

          res.send({ message: "User was registered successfully!" });
        });
      });
    }
  });
};

exports.signin = (req, res) => {
  User.findOne({
    username: req.body.username
  })
    .populate("roles", "-__v")
    .exec((err, user) => {
      if (err) {
        res.status(500).send({ message: err });
        return;
      }

      if (!user) {
        return res.status(404).send({ message: "User Not found." });
      }

      var passwordIsValid = bcrypt.compareSync(
        req.body.password,
        user.password
      );

      if (!passwordIsValid) {
        return res.status(401).send({
          accessToken: null,
          message: "Invalid Password!"
        });
      }

      var token = jwt.sign({ id: user.id }, config.secret, {
        expiresIn: 86400 // 24 hours
      });

      var authorities = [];

      for (let i = 0; i < user.roles.length; i++) {
        authorities.push("ROLE_" + user.roles[i].name.toUpperCase());
      }
      res.status(200).send({
        id: user._id,
        username: user.username,
        email: user.email,
        roles: authorities,
        accessToken: token
      });
    });
};
Chúng ta có 4 APIs chính cho việc phân quyền:
- /api/test/all
- /api/test/user
- /api/test/mod
- /api/test/admin
controllers/user.controller.js
exports.allAccess = (req, res) => {
  res.status(200).send("Public Content.");
};

exports.userBoard = (req, res) => {
  res.status(200).send("User Content.");
};

exports.adminBoard = (req, res) => {
  res.status(200).send("Admin Content.");
};

exports.moderatorBoard = (req, res) => {
  res.status(200).send("Moderator Content.");
};
Phần tiếp theo, chúng ta sẽ kết hợp các controller này với middleware. Mọi người cảm thấy mỏi thì nghỉ ngơi, làm cốc cafe để lấy sức tiếp tục nhé.
#15- Định nghĩa Routes
Khi một client gửi request tới web server sử dụng HTTP (GET, POST, PUT, DELETE) , chúng ta cần định nghĩa, xác định cách server tiếp nhận và phản hồi như thế nào. Đây chính là công dụng của các route.
Chúng ta chia các routes thành 2 nhóm: Authentication và Authorization
Authentication:
- POST /api/auth/signup
- POST /api/auth/signin
routes/auth.routes.js
const { verifySignUp } = require("../middlewares");
const controller = require("../controllers/auth.controller");

module.exports = function(app) {
  app.use(function(req, res, next) {
    res.header(
      "Access-Control-Allow-Headers",
      "x-access-token, Origin, Content-Type, Accept"
    );
    next();
  });

  app.post(
    "/api/auth/signup",
    [
      verifySignUp.checkDuplicateUsernameOrEmail,
      verifySignUp.checkRolesExisted
    ],
    controller.signup
  );

  app.post("/api/auth/signin", controller.signin);
};
Authorization:
- GET /api/test/all
- GET /api/test/user
- GET /api/test/mod
- GET /api/test/admin
routes/user.routes.js
const { authJwt } = require("../middlewares");
const controller = require("../controllers/user.controller");

module.exports = function(app) {
  app.use(function(req, res, next) {
    res.header(
      "Access-Control-Allow-Headers",
      "x-access-token, Origin, Content-Type, Accept"
    );
    next();
  });

  app.get("/api/test/all", controller.allAccess);

  app.get("/api/test/user", [authJwt.verifyToken], controller.userBoard);

  app.get(
    "/api/test/mod",
    [authJwt.verifyToken, authJwt.isModerator],
    controller.moderatorBoard
  );

  app.get(
    "/api/test/admin",
    [authJwt.verifyToken, authJwt.isAdmin],
    controller.adminBoard
  );
};
Đừng quên thêm các routes vào trong tệp server.js
...
// routes
require('./app/routes/auth.routes')(app);
require('./app/routes/user.routes')(app);

// set port, listen for requests
...
Như vậy là chúng ta đã hoàn thành dự án Node.js với Authentication rồi đấy. Bạn có thể tải toàn bộ mã nguồn trong bài viết tại đây:
Phần tiếp theo, chúng ta sẽ tiến hành chạy và test thử chương trình nhé.
#16- Run & Test chương trình
Để chạy chương trình, bạn chỉ cần gõ lệnh: npm start
Sau khi chương trình chạy, chúng sẽ tự động tạo và thêm 3 roles cần thiết vào DB. Sử dụng Robo3T để xem dữ liệu trong MongoDB.
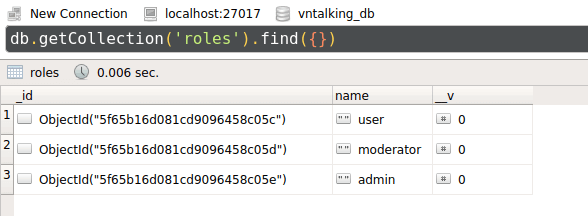
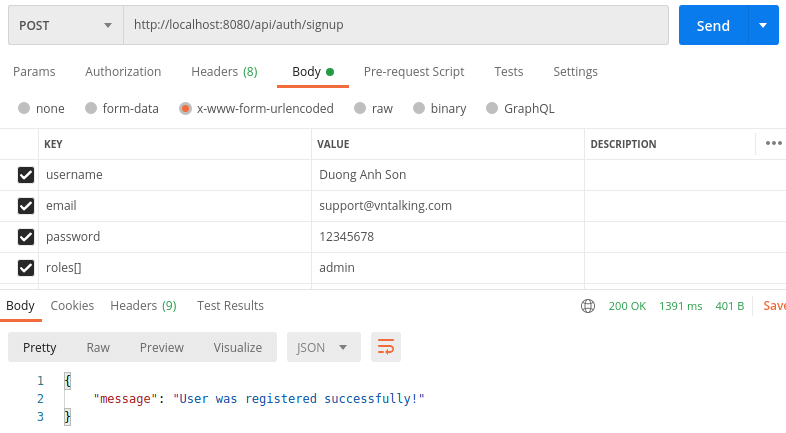
Có nhiều ứng dụng để test REST API, mình hay dùng Postman. Chúng ta test thử vớt API đăng ký mới: POST /api/auth/signup. Các API khác, các bạn tự thử nhé.
Thay lời kết
Bài viết đến đây là kết thúc, chúng ta đã khám phá và thực hiện xây dựng ứng dụng Node.js để Authentication và Authorization sử dụng JWT (JSONWebToken).
Mình hi vọng bài viết này sẽ có ích cho bạn. Nếu có thắc mắc hãy để lại bình luận bên dưới nhé.
💦 Nguồn tham khảo:


![[Angular-Day 4] Thực hành component, directive và service [Angular-Day 4] Thực hành component, directive và service](https://vntalking.com/wp-content/uploads/2021/07/series-angular2-p4-80x60.png)


![[React Native] Cách truyền dữ liệu giữa các màn hình truyền dữ liệu giữa các màn hình](https://vntalking.com/wp-content/uploads/2019/11/pass-data-between-screen-react-native-100x70.png)
Thanks Bạn! Trước mình có mua PDF học JS với NodeJS, sắp tới bạn có ra NestJS với Mongodb ko?
Dạ, mình mới chỉ có kế hoạch viết tiếp chủ đề RestFull Api với NodeJS + MongoDB thôi bạn à. Còn phần NestJS thì chắc phải sau bạn ạ
Bài viết hay, chi tiết.