

Trong hướng dẫn này, mình sẽ hướng dẫn các bạn thêm nút Load More vào RecyclerView trong ứng dụng Android.
Khi ta cuộn các item trong recycleview, các item tiếp theo được tìm nạp từ local Database hoặc Server trong khi hiển thị biểu tượng Loading giống như ứng dụng Facebook, Twitter.
Thông thường, khi cần tải một danh sách nhiều items, chúng ta không nên tải một lúc toàn bộ danh sách. Thay đó, chúng ta sẽ tải từng phần, người dùng xem đến đâu thì tải đến đó. Làm như vậy, ứng dụng sẽ không bị giật lag vì phải xử lý quá nhiều items.
Chúng ta bắt đầu nhé!

Nội dung chính của bài viết
#Cách thêm nút Load More vào RecyclerView
1. Nguyên lý tải từng phần của danh sách
Để có nút Load More ở phía cuối của RecyclerView, chúng ta sử dụng Multiple View Types trong Adapter.
♥ Xem thêm: Layout Adapter trong Recyclerview
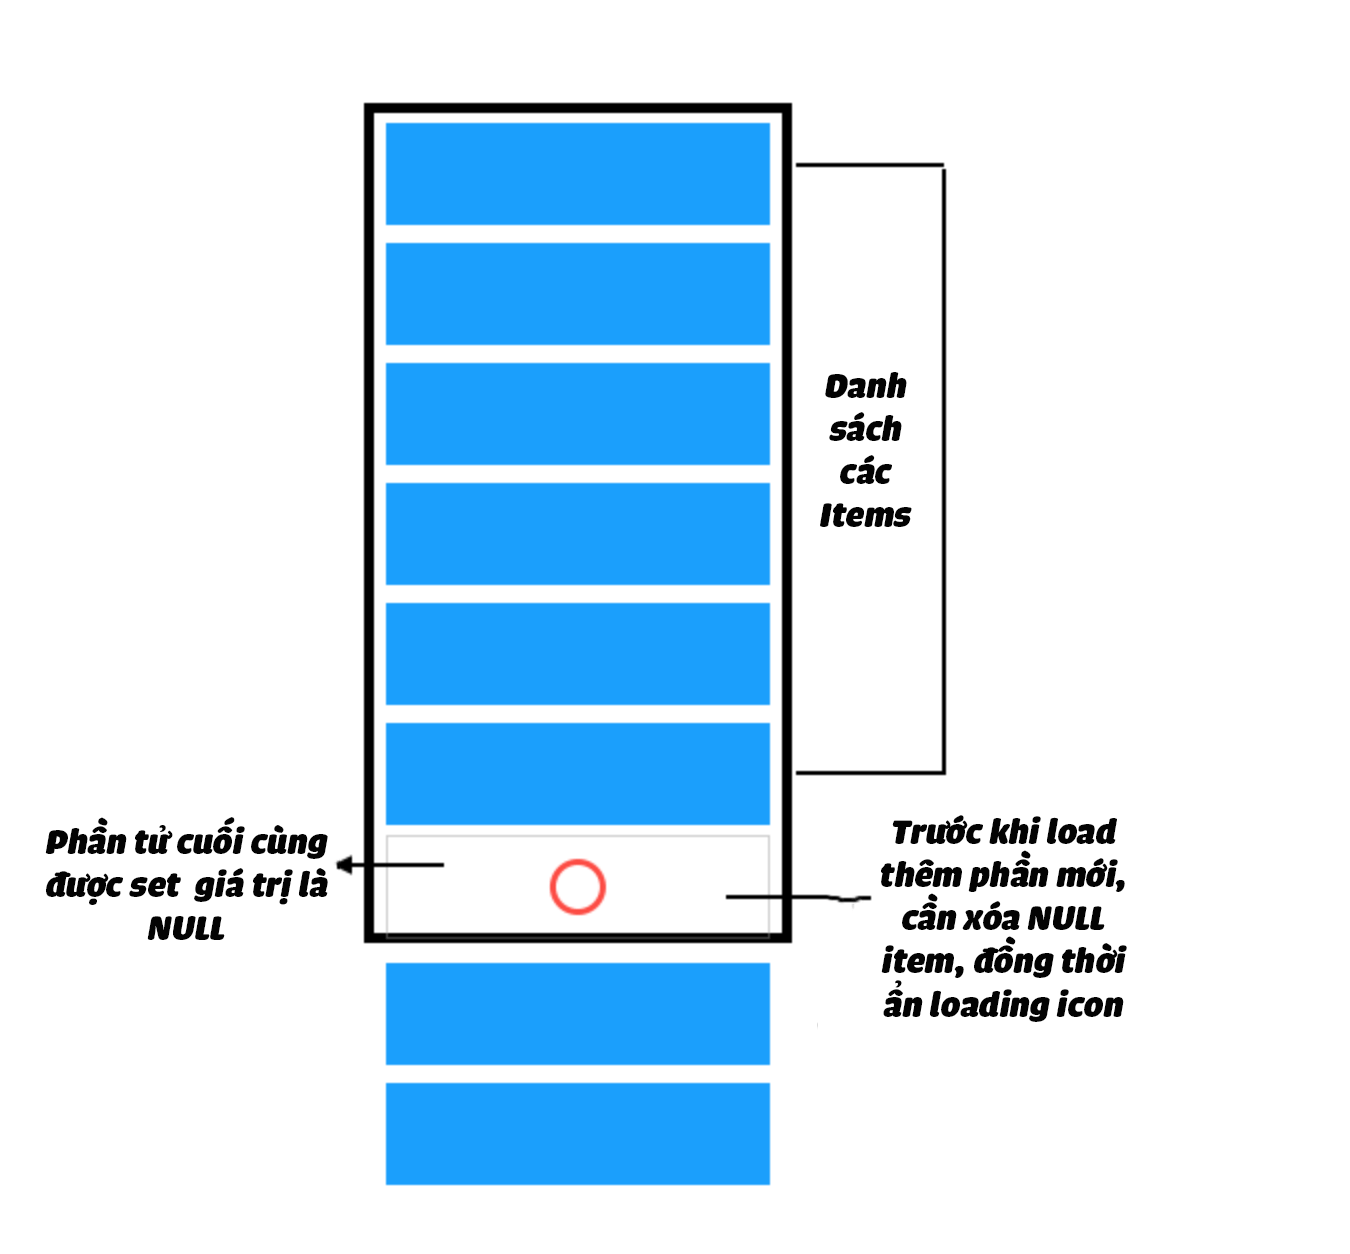
Để hiển thị nút Load More ở cuối danh sách, đầu tiên chúng ta cần thêm một phần NULL vào cuối list data.
Tại sao là null?
Đơn giản là để phân biệt nút Load More với các thành phần còn lại của danh sách.
Sau khi thêm null,chúng ta thông báo cho adapter hãy thêm phần tử mới tiếp theo để hiển thị nếu còn data.
Sau khi các phần tử mới được thêm vào thì chúng ta lại xoá phần tử null đó đi.
>> Tìm hiểu thêm về RecyclerView: Toàn tập về RecyclerView trong Android
2.Thực hiện thêm nút Load More vào RecyclerView Android
Đầu tiên các bạn thêm thư viện trong file build.gradle
implementation 'com.android.support:recyclerview-v7:28.0.0'
implementation 'com.android.support:support-v4:28.0.0'
implementation 'com.android.support:cardview-v7:28.0.0'
Các bạn thiết kế layout activity_main.xml với 1 recycleview full màn hình
<?xml version="1.0" encoding="utf-8"?>
<android.support.constraint.ConstraintLayout xmlns:android="http://schemas.android.com/apk/res/android"
    xmlns:app="http://schemas.android.com/apk/res-auto"
    xmlns:tools="http://schemas.android.com/tools"
    android:layout_width="match_parent"
    android:layout_height="match_parent"
    tools:context=".MainActivity">

    <android.support.v7.widget.RecyclerView
        android:id="@+id/recyclerView"
        android:layout_width="match_parent"
        android:layout_height="wrap_content"
        app:layoutManager="android.support.v7.widget.LinearLayoutManager"
        app:layout_constraintBottom_toBottomOf="parent"
        app:layout_constraintLeft_toLeftOf="parent"
        app:layout_constraintRight_toRightOf="parent"
        app:layout_constraintTop_toTopOf="parent" />

</android.support.constraint.ConstraintLayout>
Tạo 2 layout mới , item_row dành cho việc hiển thị các item và item_loading dành cho hiển thị progress.
//item_row.xml
<?xml version="1.0" encoding="utf-8"?>
<android.support.v7.widget.CardView xmlns:android="http://schemas.android.com/apk/res/android"
    xmlns:app="http://schemas.android.com/apk/res-auto"
    android:layout_width="match_parent"
    android:layout_height="wrap_content"
    app:cardElevation="8dp"
    app:cardUseCompatPadding="true">


    <TextView
        android:id="@+id/tvItem"
        android:layout_width="match_parent"
        android:layout_height="wrap_content"
        android:padding="16dp"
        android:text="Item X" />

</android.support.v7.widget.CardView>
//item_loading.xml
<?xml version="1.0" encoding="utf-8"?>
<LinearLayout xmlns:android="http://schemas.android.com/apk/res/android"
    android:layout_width="match_parent"
    android:layout_height="wrap_content"
    android:layout_margin="8dp"
    android:orientation="vertical">

    <ProgressBar
        android:id="@+id/progressBar"
        android:layout_width="wrap_content"
        android:layout_height="wrap_content"
        android:layout_gravity="center_horizontal"
        android:indeterminate="true"
        android:paddingLeft="8dp"
        android:paddingRight="8dp"
        />

</LinearLayout>
Tiếp theo, chúng ta tạo class RecyclerViewAdapter.java
Trong đó: getItemViewType() hàm này có tác dụng là check các element trong 1 list. Nếu element là null thì chúng ta set viewtype là 1, ngược lại là 0
Trong hàm onBindViewholder() chúng ta cũng check các type của Viewholder để phân biệt các item.
@Override
public void onBindViewHolder(@NonNull RecyclerView.ViewHolder viewHolder, int position) {

    if (viewHolder instanceof ItemViewHolder) {

        populateItemRows((ItemViewHolder) viewHolder, position);
    } else if (viewHolder instanceof LoadingViewHolder) {
        showLoadingView((LoadingViewHolder) viewHolder, position);
    }

}

@Override
public int getItemViewType(int position) {
    return mItemList.get(position) == null ? VIEW_TYPE_LOADING : VIEW_TYPE_ITEM;
}
Bây giờ chúng ta viêt trong hàm MainActivity.java. Chúng ta sẽ tiến hành “nhồi” data vào Recycler.
Trong đó, mình muốn lưu ý đến hàm iniScrollListener(). Hàm iniScrollListener() để kiểm tra trạng thái scroll của người dùng trên recycleview
//MainActivity.java
 private void initScrollListener() {
        recyclerView.addOnScrollListener(new RecyclerView.OnScrollListener() {
            @Override
            public void onScrollStateChanged(@NonNull RecyclerView recyclerView, int newState) {
                super.onScrollStateChanged(recyclerView, newState);
            }

            @Override
            public void onScrolled(@NonNull RecyclerView recyclerView, int dx, int dy) {
                super.onScrolled(recyclerView, dx, dy);

                LinearLayoutManager linearLayoutManager = (LinearLayoutManager) recyclerView.getLayoutManager();

                if (!isLoading) {
                    if (linearLayoutManager != null && linearLayoutManager.findLastCompletelyVisibleItemPosition() == rowsArrayList.size() - 1) {
                        //bottom of list!
                        loadMore();
                        isLoading = true;
                    }
                }
            }
        });


    }

    private void loadMore() {
        rowsArrayList.add(null);
        recyclerViewAdapter.notifyItemInserted(rowsArrayList.size() - 1);


        Handler handler = new Handler();
        handler.postDelayed(new Runnable() {
            @Override
            public void run() {
                rowsArrayList.remove(rowsArrayList.size() - 1);
                int scrollPosition = rowsArrayList.size();
                recyclerViewAdapter.notifyItemRemoved(scrollPosition);
                int currentSize = scrollPosition;
                int nextLimit = currentSize + 10;

                while (currentSize - 1 < nextLimit) {
                    rowsArrayList.add("Item " + currentSize);
                    currentSize++;
                }

                recyclerViewAdapter.notifyDataSetChanged();
                isLoading = false;
            }
        }, 2000);
Trong bài viết này, mình tạo một dump data chỉ để test bằng hàm:
private void populateData() {
        int i = 0;
        while (i < 10) {
            rowsArrayList.add("Item " + i);
            i++;
        }
    }
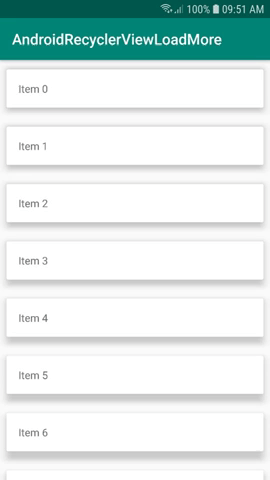
Đây là kết quả chúng ta đạt được
#Tạm kết
Như vậy, mình đã hướng dẫn các bạn cách đơn giản để thêm một nút Load More vào RecyclerView. Đây là trải nghiệm rất phổ biến với các ứng dụng hiển thị danh sách như đọc, báo, xem phim, mạng xã hội…
Các bạn có thể download source code hoàn chỉnh tại đây:
Ngoài ra, các bạn có thể tham khảo những bài viết hướng dẫn khác của mình về Android tại đây:
- Xây dựng giao diện chat head giống Facebook Mesager
- Xây dựng ứng dụng máy tính hoàn chỉnh
- Tự tạo ứng dụng đánh đành Piano hoàn chỉnh
Hy vọng bài hôm nay sẽ giúp các bạn hiểu chi tiết về Load More Recycleview trong Android.
Bạn đã từng sử dụng nut Load more cho ứng dụng của mình chưa? Để lại cảm nhận của mình bên dưới phần bình luận nhé!

Nhận sách Java Advanced Features
Java là ngôn ngữ lập trình phổ biến nhất thế giới, là hình mẫu của tư tưởng OOP. Nếu bạn muốn bắt đầu với Java thì đây là cuốn sách không thể bỏ qua. Với 63 ví dụ thực hành, cùng với cách viết ngắn gọn dễ hiểu sẽ giúp bạn hiểu rõ bản chất của Java.
Hiện Amazon đang bán với giá 16$, nhưng với VNTALKING thì miễn phí cho bạn. Còn chờ gì nữa?


![[Angular-Day 4] Thực hành component, directive và service](https://vntalking.com/wp-content/uploads/2021/07/series-angular2-p4-80x60.png "[Angular-Day 4] Thực hành component, directive và service")

 web với Node.js")


Chào bạn, bạn thêm item_loading.xml vào chỗ nào sao mình k thấy
Hi
Bạn thêm vào thư mục res/layout nhé