

Bài viết trước, mình đã giới thiệu với các bạn những thông tin cơ bản về Android Jetpack, như: Android Jetpack là gì? Những ưu điểm nổi bật của Jetpack… Phần tiếp theo, chúng ta sẽ tìm hiểu kỹ hơn về Android Jetpack, đặc biệt là cách sử dụng WorkManager.
Trong quá trình tìm hiểu cách sử dụng WorkManager, chúng ta sẽ tự xây dựng một ứng dụng làm mờ ảnh bằng hiệu ứng Blur.
Chúng ta bắt đầu nhé!
Nội dung chính của bài viết
#WorkManager là gì?sử dụng WorkManager để làm gì?
WorkManager là một thư viện trong Android Jetpack. Mục đích WorkManager ra đời là hỗ trợ việc quản lý các Thread chạy dưới background.
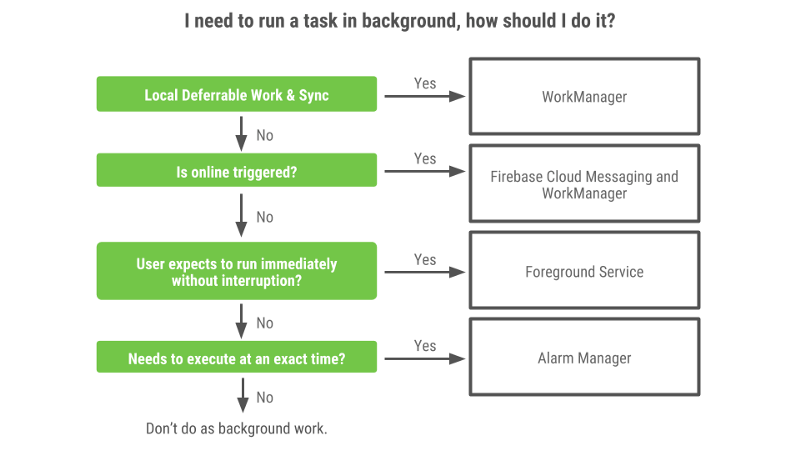
Khi nào thì chúng ta cần sử dụng WorkManager?
Để trả lời cho câu hỏi này thì chúng ta cần phải hiểu thế nào là một thread chạy dưới background.
Mỗi một ứng dụng Android đều có một main thread mặc định. Đó là Main UI Thread. Tất cả tương tác với người dùng đều thông qua thread này.
Tuy nhiên, nếu chúng ta thực hiện những tác vụ cần thời gian xử lý sẽ làm block UI thead. Điều này gây ra hiện tượng giật lag của ứng dụng. Thậm chí là ANR (Android Not Responing).
Vì vậy, để tránh ứng dụng bị giật lag khi phải xử lý tác vụ nặng. Người ta sẽ xử lý các tác vụ đó dưới background.
Nếu bạn code ứng dụng Android theo cách thông thường thì có thể sử dụng một số cách như: AsyncTask, Service…
Tương tự, trong Android Jetpack thì đó là WorkManager.
💦 Đọc thêm:
- AsyncTask trong Android – công cụ xử lý đa luồng hữu hiệu
- Service trong Android là gì? Các loại service trong android
#Các class và khái niệm cần lưu ý khi sử dụng WorkManager
1. Worker
Trong Android Jetpack thì Worker là một abstract class. Trong Worker có hàm doWork(), với cách thức làm việc tương tự như doInBackground() của AsyncTask.
2. WorkRequest
Nhiệm vụ chính của WorkRequest là xác định lớp Worker nào sẽ thực hiện nhiệm vụ.
Mỗi WorkRequest có một ID duy nhất. Thông qua ID này, bạn có thể cancel task hoặc lấy trạng thái của task.
Tương tự như Worker, WorkRequest là một abstract class nên bạn sẽ sử dụng một trong các lớp con của nó là OneTimeWorkRequest hoặc PeriodicWorkRequest.
- OneTimeWorkRequest: Đây là loại WorkRequest chỉ thực hiện duy nhất một lần.
- PeriodicWorkRequest: Người với OneTimeWorkRequest, WorkRequest sẽ thực hiện lặp đi lặp lại nhiều lần cho đến khi bị hủy. Thời gian lặp giữa mỗi lần lặp tối thiểu là 15 phút.
3. WorkInfo
Class này chứa thông tin về một task cụ thể.
WorkManager cung cấp một LiveData cho mỗi đối tượng WorkRequest. LiveData chứa đối tượng WorkInfo, bằng cách observe LiveData, bạn có thể xác định trạng thái hiện tại của tác vụ và nhận bất kỳ giá trị trả về (output Data) nào sau khi tác vụ kết thúc.
4. WorkContinuation
Lớp này được dùng khi bạn muốn thực thi một chuỗi các task liên tiếp nhau.
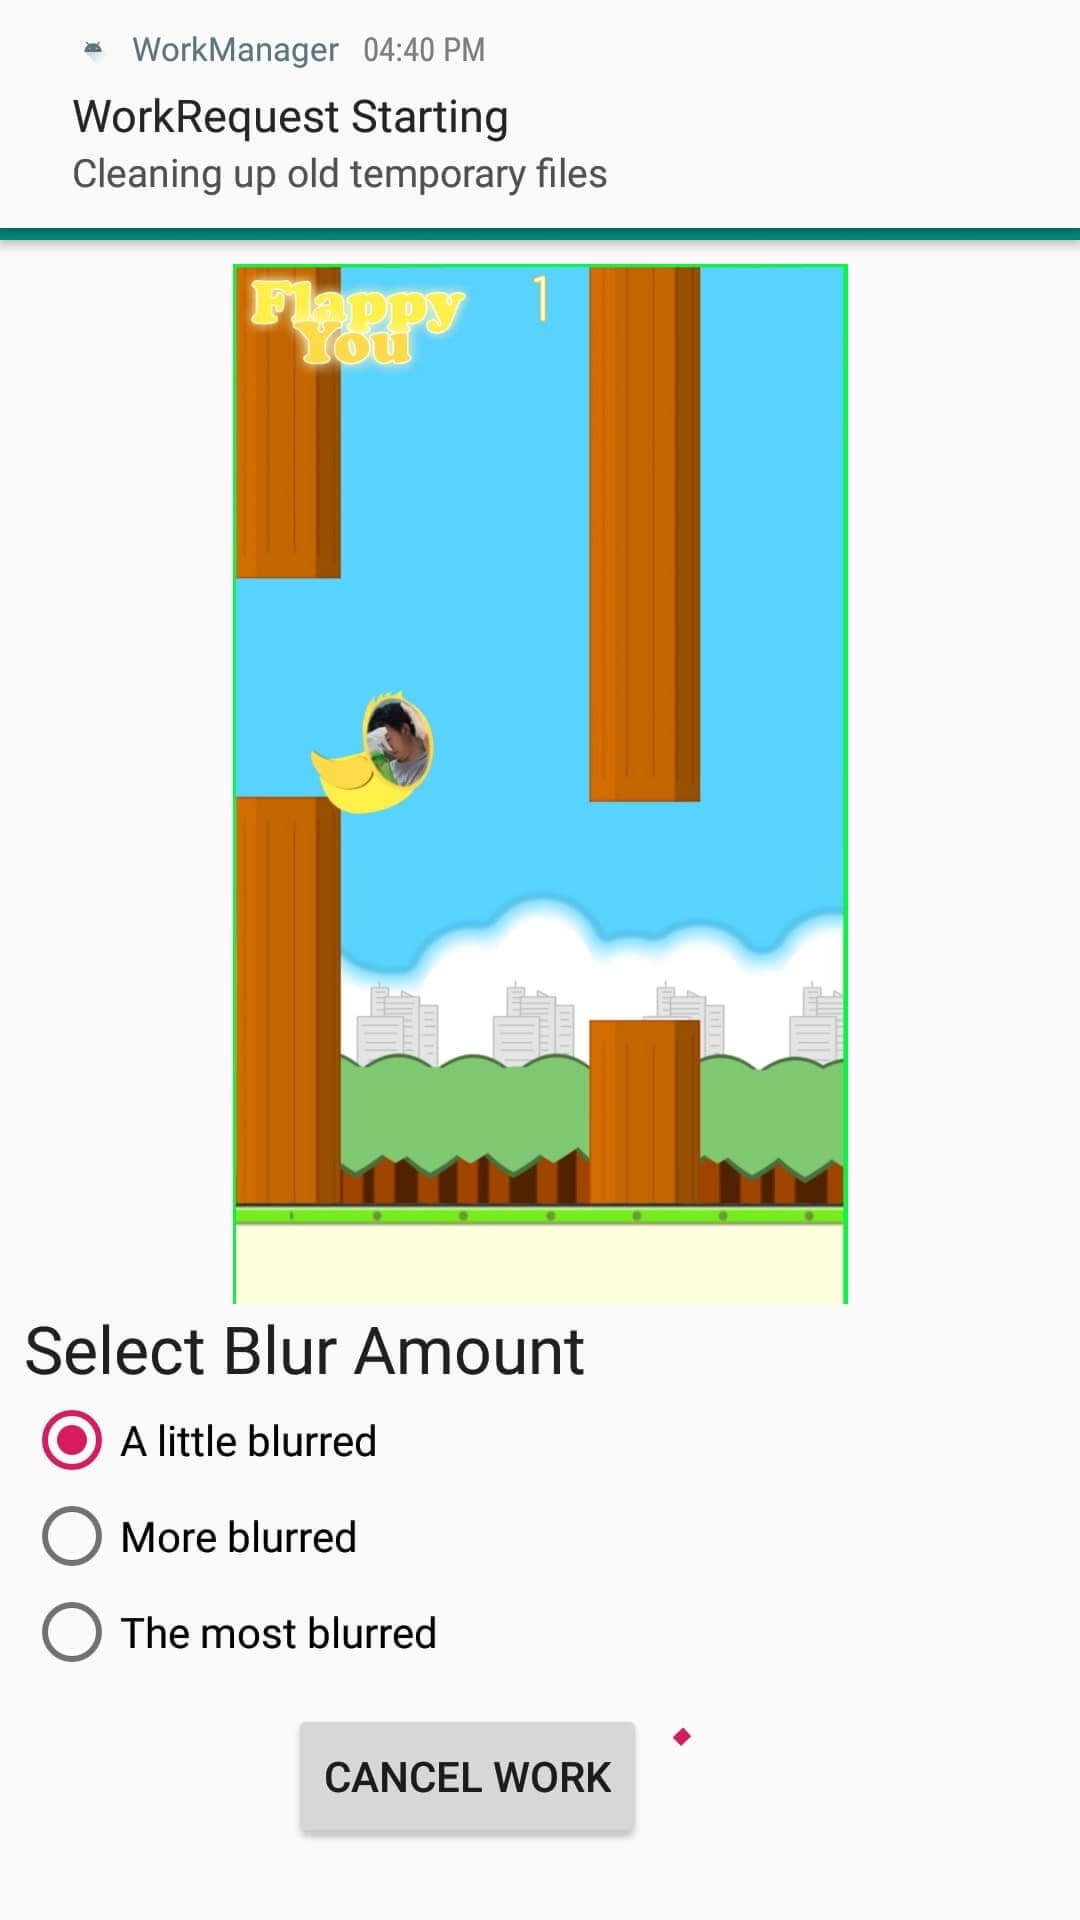
#Sử dụng WorkManager và demo ứng dụng làm mờ ảnh.
Mô tả demo: Chúng ta sẽ chọn một ảnh trong gallery, chọn chế độ làm mờ rồi có thể save & view ảnh sau khi đã hoàn thành.
Mình sẽ sử dụng WorkContinuation trong ứng dụng này. Như mình trình bày ở trên, với WorkContinuation, khi bạn đang làm mờ ảnh thì dù có tắt app thì nó vẫn thực hiện cho tới khi hoàn thành công việc.
Bước 1: Import thư viện cần thiết
Các bạn import thư viện vào file build.gradle
dependencies {
    implementation fileTree(dir: 'libs', include: ['*.jar'])
    implementation 'com.android.support:appcompat-v7:28.0.0'
    implementation 'com.android.support.constraint:constraint-layout:1.1.3'
    testImplementation 'junit:junit:4.12'
    androidTestImplementation 'com.android.support.test:runner:1.0.2'
    androidTestImplementation 'com.android.support.test.espresso:espresso-core:3.0.2'
    implementation "android.arch.work:work-runtime:1.0.0-rc02"
    implementation "com.github.bumptech.glide:glide:4.8.0"
}
Bước 2: Tạo lớp MyWorker kế thừa từ lớp Worker
MyWorker: Thực hiện thao tác chính là làm mờ ảnh
public class MyWork extends Worker {
    private static final String TAG = MyWork.class.getSimpleName();

    public MyWork(@NonNull Context context, @NonNull WorkerParameters workerParams) {
        super(context, workerParams);
    }

    @NonNull
    @Override
    public Worker.Result doWork() {

        Context applicationContext = getApplicationContext();

        // Makes a notification when the work starts and slows down the work so that it's easier to
        // see each WorkRequest start, even on emulated devices
        WorkerUtils.makeStatusNotification("Blurring image", applicationContext);
        WorkerUtils.sleep();

        String resourceUri = getInputData().getString(KEY_IMAGE_URI);
        try {
            if (TextUtils.isEmpty(resourceUri)) {
                Log.e(TAG, "Invalid input uri");
                throw new IllegalArgumentException("Invalid input uri");
            }

            ContentResolver resolver = applicationContext.getContentResolver();

            // Create a bitmap
            Bitmap bitmap = BitmapFactory.decodeStream(
                    resolver.openInputStream(Uri.parse(resourceUri)));

            // Blur the bitmap
            Bitmap output = WorkerUtils.blurBitmap(bitmap, applicationContext);

            // Write bitmap to a temp file
            Uri outputUri = WorkerUtils.writeBitmapToFile(applicationContext, output);

            // Return the output for the temp file
            setOutputData(new Data.Builder().putString(
                    KEY_IMAGE_URI, outputUri.toString()).build());

            // If there were no errors, return SUCCESS
            return Worker.Result.SUCCESS;
        } catch (FileNotFoundException fileNotFoundException) {
            Log.e(TAG, "Failed to decode input stream", fileNotFoundException);
            throw new RuntimeException("Failed to decode input stream", fileNotFoundException);

        } catch (Throwable throwable) {

            // If there were errors, return FAILURE
            Log.e(TAG, "Error applying blur", throwable);
            return Worker.Result.FAILURE;
        }
    }
}
Bước 3: Tạo lớp CleanupWorker
CleanupWorker: Xoá đi các file tạm trong quá trình làm mờ ảnh.
/**
 * Cleans up temporary files generated during blurring process
 */
public class CleanupWorker extends Worker {

    /**
     * Creates an instance of the {@link Worker}.
     *
     * @param appContext   the application {@link Context}
     * @param workerParams the set of {@link WorkerParameters}
     */
    public CleanupWorker(@NonNull Context appContext, @NonNull WorkerParameters workerParams) {
        super(appContext, workerParams);
    }

    private static final String TAG = CleanupWorker.class.getSimpleName();

    @NonNull
    @Override
    public Worker.Result doWork() {
        Context applicationContext = getApplicationContext();

        // Makes a notification when the work starts and slows down the work so that it's easier to
        // see each WorkRequest start, even on emulated devices
        WorkerUtils.makeStatusNotification("Cleaning up old temporary files",
                applicationContext);
        WorkerUtils.sleep();

        try {
            File outputDirectory = new File(applicationContext.getFilesDir(),
                    Constants.OUTPUT_PATH);
            if (outputDirectory.exists()) {
                File[] entries = outputDirectory.listFiles();
                if (entries != null && entries.length > 0) {
                    for (File entry : entries) {
                        String name = entry.getName();
                        if (!TextUtils.isEmpty(name) && name.endsWith(".png")) {
                            boolean deleted = entry.delete();
                            Log.i(TAG, String.format("Deleted %s - %s", name, deleted));
                        }
                    }
                }
            }
            return Worker.Result.success();
        } catch (Exception exception) {
            Log.e(TAG, "Error cleaning up", exception);
            return Result.failure();
        }
    }
}
Bước 4:Các bạn tạo lớp SaveImageToFileWorker
SaveImageToFileWorker: Save ảnh đã xử lý xong.
/**
 * Saves the image to a permanent file
 */
public class SaveImageToFileWorker extends Worker {

    /**
     * Creates an instance of the {@link Worker}.
     *
     * @param appContext   the application {@link Context}
     * @param workerParams the set of {@link WorkerParameters}
     */
    public SaveImageToFileWorker(
            @NonNull Context appContext,
            @NonNull WorkerParameters workerParams
    ) {
        super(appContext, workerParams);
    }

    private static final String TAG = SaveImageToFileWorker.class.getSimpleName();

    private static final String TITLE = "Blurred Image";
    private static final SimpleDateFormat DATE_FORMATTER =
            new SimpleDateFormat("yyyy.MM.dd 'at' HH:mm:ss z", Locale.getDefault());

    @NonNull
    @Override
    public Worker.Result doWork() {
        Context applicationContext = getApplicationContext();

        // Makes a notification when the work starts and slows down the work so that it's easier to
        // see each WorkRequest start, even on emulated devices
        WorkerUtils.makeStatusNotification("Saving image", applicationContext);
        WorkerUtils.sleep();

        ContentResolver resolver = applicationContext.getContentResolver();
        try {
            String resourceUri = getInputData()
                    .getString(Constants.KEY_IMAGE_URI);
            Bitmap bitmap = BitmapFactory.decodeStream(
                    resolver.openInputStream(Uri.parse(resourceUri)));
            String imageUrl = MediaStore.Images.Media.insertImage(
                    resolver, bitmap, TITLE, DATE_FORMATTER.format(new Date()));
            if (TextUtils.isEmpty(imageUrl)) {
                Log.e(TAG, "Writing to MediaStore failed");
                return Result.failure();
            }
            Data outputData = new Data.Builder()
                    .putString(Constants.KEY_IMAGE_URI, imageUrl)
                    .build();
            return Result.success(outputData);
        } catch (Exception exception) {
            Log.e(TAG, "Unable to save image to Gallery", exception);
            return Result.failure();
        }
    }
}
Bước 5: Tạo WorkRequest
Các bạn chắc vẫn còn nhớ các thành phần của WorkManager chứ : Worker, WorkRequest và WorkManager.
Chúng ta tạo class WorkRequest với nhiệm vụ chính là tạo ra yêu cầu từ các worker. Trên UI sẽ có chút thay đổi ở button See File nếu như có Uri của image đã được làm mờ xong.
Cho nên mình sẽ để WorkRequest trong BlurViewModel.
public class BlurViewModel extends ViewModel {

    private WorkManager mWorkManager;
    private Uri mImageUri;
    private Uri mOutputUri;
    private LiveData<List<WorkInfo>> mSavedWorkInfo;

    public BlurViewModel() {

        mWorkManager = WorkManager.getInstance();

        // This transformation makes sure that whenever the current work Id changes the WorkInfo
        // the UI is listening to changes
        mSavedWorkInfo = mWorkManager.getWorkInfosByTagLiveData(TAG_OUTPUT);
    }

    /**
     * Create the WorkRequest to apply the blur and save the resulting image
     * @param blurLevel The amount to blur the image
     */
    void applyBlur(int blurLevel) {

        // Add WorkRequest to Cleanup temporary images
        WorkContinuation continuation = mWorkManager
                .beginUniqueWork(IMAGE_MANIPULATION_WORK_NAME,
                        ExistingWorkPolicy.REPLACE,
                        OneTimeWorkRequest.from(CleanupWorker.class));

        // Add WorkRequests to blur the image the number of times requested
        for (int i = 0; i < blurLevel; i++) {
            OneTimeWorkRequest.Builder blurBuilder =
                    new OneTimeWorkRequest.Builder(MyWork.class);

            // Input the Uri if this is the first blur operation
            // After the first blur operation the input will be the output of previous
            // blur operations.
            if ( i == 0 ) {
                blurBuilder.setInputData(createInputDataForUri());
            }

            continuation = continuation.then(blurBuilder.build());
        }

        // Create charging constraint
        Constraints constraints = new Constraints.Builder()
                .setRequiresCharging(true)
                .build();

        // Add WorkRequest to save the image to the filesystem
        OneTimeWorkRequest save = new OneTimeWorkRequest.Builder(SaveImageToFileWorker.class)
                .setConstraints(constraints)
                .addTag(TAG_OUTPUT)
                .build();
        continuation = continuation.then(save);

        // Actually start the work
        continuation.enqueue();

    }

    /**
     * Cancel work using the work's unique name
     */
    void cancelWork() {
        mWorkManager.cancelUniqueWork(IMAGE_MANIPULATION_WORK_NAME);
    }

    /**
     * Creates the input data bundle which includes the Uri to operate on
     * @return Data which contains the Image Uri as a String
     */
    private Data createInputDataForUri() {
        Data.Builder builder = new Data.Builder();
        if (mImageUri != null) {
            builder.putString(KEY_IMAGE_URI, mImageUri.toString());
        }
        return builder.build();
    }

    private Uri uriOrNull(String uriString) {
        if (!TextUtils.isEmpty(uriString)) {
            return Uri.parse(uriString);
        }
        return null;
    }

    /**
     * Setters
     */
    void setImageUri(String uri) {
        mImageUri = uriOrNull(uri);
    }

    void setOutputUri(String outputImageUri) {
        mOutputUri = uriOrNull(outputImageUri);
    }

    /**
     * Getters
     */
    Uri getImageUri() {
        return mImageUri;
    }

    Uri getOutputUri() { return mOutputUri; }

    LiveData<List<WorkInfo>> getOutputWorkInfo() { return mSavedWorkInfo; }
}
Đến đây mình giải thích thêm một chút để các bạn rõ hơn.
mWorkManager = WorkManager.getInstance();
mSavedWorkStatus = mWorkManager.getStatusesByTag(TAG_OUTPUT);
Đây là lúc khởi tạo WorkManager và lấy giá trị status ban đầu xem công việc save ảnh đã hoàn thành chưa.
Tiếp theo WorkManager quản lý và thực thi worker đầu tiên là xoá file tạm (tất nhiên nó không có ý nghĩa với lần chạy ứng dụng đầu tiên) nhưng rất cần thiết từ lần chạy thứ 2.
// Add WorkRequest to Cleanup temporary images WorkContinuation
continuation = mWorkManager.beginUniqueWork(IMAGE_MANIPULATION_WORK_NAME, ExistingWorkPolicy.REPLACE, OneTimeWorkRequest.from(CleanupWorker.class));
Các lần add worker tiếp theo bạn có thể thấy lần lượt là Blur và Save worker.
continuation = continuation.then(blurBuilder.build());
continuation = continuation.then(save);
Và có một điều kiện ràng buộc cho chức năng này, đó là thiết bị phải đang sạc điện:
// Create charging constraint Constraints
constraints = new Constraints.Builder().setRequiresCharging(true).build();
Sau mọi setup hoàn tất thì câu lệnh sau dùng để start công việc đã được chỉ định rõ ràng.
// Actually start the work
continuation.enqueue();
Vậy là xong. Bạn build dự án và tận hưởng thành quả nhé.
Download toàn bộ source của bài viết tại đây.
Tạm kết
Như vậy, chúng ta đã biết cách sử dụng WorkManager thông qua việc xây dựng làm mờ ảnh rồi đúng không?
Mình hi vọng, bài viết sẽ giúp ích cho các bạn hiểu hơn về một bộ công cụ Android Jetpack rất mới mẻ này.
Android Jetpack vẫn còn rất nhiều tính năng hay ho khác nữa, mình sẽ chia sẻ dần dần.
Các bạn đừng quên chia sẻ bài viết ủng hộ mình nhé.


 android đúng nhất – không lỗi")


 dễ hơn với PurchaseHelper")

Những bài viết của anh rất hay và dể hiểu. Thanks anh nhiều