

Chắc hẳn bạn đã gặp rất nhiều ứng dụng cần phải xác thực số điện thoại , kiểu như xác thực qua mã OTP như: Zalo, Whatsapp, các ứng dụng ngân hàng, ví điện tử… Bạn có nghĩ rằng tính năng này rất cao siêu không? Cần phải có hệ thống hạ tầng mạng, hay phải liên kết với nhà mạng gì đó không?
Đấy là chuyện của ngày xưa thôi, bây giờ bạn đã có công cụ giúp bạn tạo tính năng xác thực hiện đại này chỉ bằng vài dòng code. Bí kíp đó chính là sử dụng Firebase. Bài viết này mình sẽ chia sẻ cách tạo tính năng xác thực số điện thoại bằng Firebase, rất đơn giản.
Nếu bạn chưa thực sự hiểu rõ Fisebase thì đọc bài cũ của mình về Firebase – dịch vụ tuyệt vời của google nhé!
Logic cơ bản của tính năng này là: Điền số điện thoại, nhận mã OTP và sử dụng mã OTP để xác thực.
Chúng ta cùng bắt đầu nhé
Nội dung chính của bài viết
Khi nào thì ứng dụng cần phải xác thực số điện thoại người dùng?
Ứng dụng của bạn cần xác thực số điện thoại của người dùng khi:
- Hạn chế người dùng ảo: Khi bạn xác thực số điện thoại, bạn sẽ hạn chế người dùng đăng kí nhiều tài khoản ảo. Mặc dù ở Việt Nam, tình trạng SIM rác vẫn còn rất phổ biến nhưng dù sao có tính năng này cũng hạn chế phần nào.
- Cần tăng giá trị người dùng: Khi bạn đã các thực người dùng bằng số điện thoại thì việc đây là tài khoản thật sự, không phải tài khoản ảo. Điều này làm tăng giá trị cho mỗi tài khoản trên ứng dụng của bạn
- Cần tăng tính bảo mật và trải nghiệm người dùng: Với người dùng đã xác thực, bạn có thể sử dụng số điện thoại người dùng như là một cổng an ninh, tăng cường tính bảo mật. Mình ví dụ như: Bạn có thể khôi phục mật khẩu thông qua số điện thoại, hay gửi mã OTP mỗi khi thực hiện thanh toán…
Tại sao lại lựa chọn Firebase?
Để có thể làm được tính năng xác thực số điện thoại, bạn cần phải sử dụng một dịch vụ SMS nào đó.
Nhưng với Firebase thì bạn được MIỄN PHÍ hoàn toàn, quá tuyệt phải không?

Với Free plan của Firebase, bạn sẽ có 10,000 tin nhắn mỗi tháng. Theo mình như vậy là đủ dùng cho một ứng dụng vừa và nhỏ.
Nếu bạn có nhu cầu dùng thêm thì có thể thanh toán. Bạn có thể tham khảo bảng giá tại đây
Chúng ta cùng nhau tìm hiểu các tích hợp tính năng xác thực này vào ứng dụng Android nhé
Tạo một dự án Android Studio mới
Bạn tạo một dự án mới bằng Android Studio như bình thường
Nếu bạn chưa biết cách thực hiện thì có thể tham khảo bài viết: Hướng dẫn toàn tập về cách sử dụng Android Studio
#1. Thêm Firebase Authentication vào dự án
Trong Android Studio, bạn chọn tools -> firebase. Android Studio sẽ hiển thị màn hình để hướng dẫn bạn thêm firebase service vào dự án. Bạn cứ bình tĩnh làm theo hướng dẫn của nó là được
#2. Bật tính năng Firebase Phone Authentication
Phần này, bạn vào Firebase Console, mở dự án mà bạn muốn tích hợp tính năng xác thực.
Sau đó chọn Sign In Method -> Bật Phone Authentication

#3. Thiết kế giao diện ứng dụng Android
Trước khi bắt tay vào thiết kế giao diện cho ứng dụng, mình muốn note lại là: Với tính năng Sign In, chúng ta sẽ cần 2 Activities.
Một Activity để người dùng nhập số điện thoại và một Activity để nhập mã xác thực được nhận qua SMS
Màn hình nhập số điện thoại
Màn hình này mình làm đơn giản thôi, chỉ có một Edittext để nhập số điện thoại và một Button

Các bạn có thể tham khảo đoạn mã bên dưới (màn hình này mình đặt tên file layout là activity_main.xml )
<?xml version="1.0" encoding="utf-8"?>
<RelativeLayout xmlns:android="http://schemas.android.com/apk/res/android"
    xmlns:app="http://schemas.android.com/apk/res-auto"
    xmlns:tools="http://schemas.android.com/tools"
    android:layout_width="match_parent"
    android:layout_height="match_parent"
    tools:context=".MainActivity">

    <RelativeLayout
        android:id="@+id/relativeLayout"
        android:layout_width="match_parent"
        android:layout_height="200dp"
        android:background="@color/colorPrimary"
        android:orientation="horizontal">

        <ImageView
            android:layout_width="120dp"
            android:layout_height="120dp"
            android:layout_centerHorizontal="true"
            android:layout_centerVertical="true"
            android:background="@drawable/ic_logo" />

    </RelativeLayout>

    <ImageView
        android:id="@+id/imageView"
        android:layout_width="match_parent"
        android:layout_height="120dp"
        android:layout_below="@id/relativeLayout"
        android:layout_marginTop="-50dp"
        android:background="@drawable/waves" />

    <RelativeLayout
        android:id="@+id/container"
        android:layout_width="match_parent"
        android:layout_height="match_parent"
        android:layout_below="@id/imageView"
        android:orientation="vertical"
        android:padding="20dp">

        <TextView
            android:id="@+id/textView"
            android:layout_width="wrap_content"
            android:layout_height="wrap_content"
            android:layout_centerHorizontal="true"
            android:layout_marginTop="25dp"
            android:text="May I ask your phone number?"
            android:textAppearance="@style/Base.TextAppearance.AppCompat.Headline"
            android:textColor="@color/colorPrimary" />

        <EditText
            android:id="@+id/editTextMobile"
            android:layout_width="match_parent"
            android:layout_height="wrap_content"
            android:layout_below="@id/textView"
            android:layout_marginTop="20dp"
            android:digits="0123456789"
            android:drawableLeft="@drawable/ic_phone"
            android:drawablePadding="10dp"
            android:hint="enter your mobile number"
            android:inputType="phone"
            android:maxLength="10" />

        <Button
            android:id="@+id/buttonContinue"
            android:layout_width="wrap_content"
            android:layout_height="wrap_content"
            android:layout_below="@id/editTextMobile"
            android:layout_centerHorizontal="true"
            android:layout_marginTop="15dp"
            android:background="@color/colorPrimaryDark"
            android:text="Continue"
            android:textAllCaps="false"
            android:textColor="#cdd8f1" />

    </RelativeLayout>

</RelativeLayout>
Màn hình nhập mã xác thực
Sau khi thiết kế xong màn hình nhập số điện thoại, giờ đến màn hình nhập mã xác thực. Màn hình này cũng giống màn hình trước, tức là cũng có một EditText để nhập code.
Tuy nhiên, có một điểm mới là ứng dụng sẽ tự động detect được SMS và điền mã code
Đầu tiên là bạn tạo một Activity có tên là VerifyPhoneActivity.
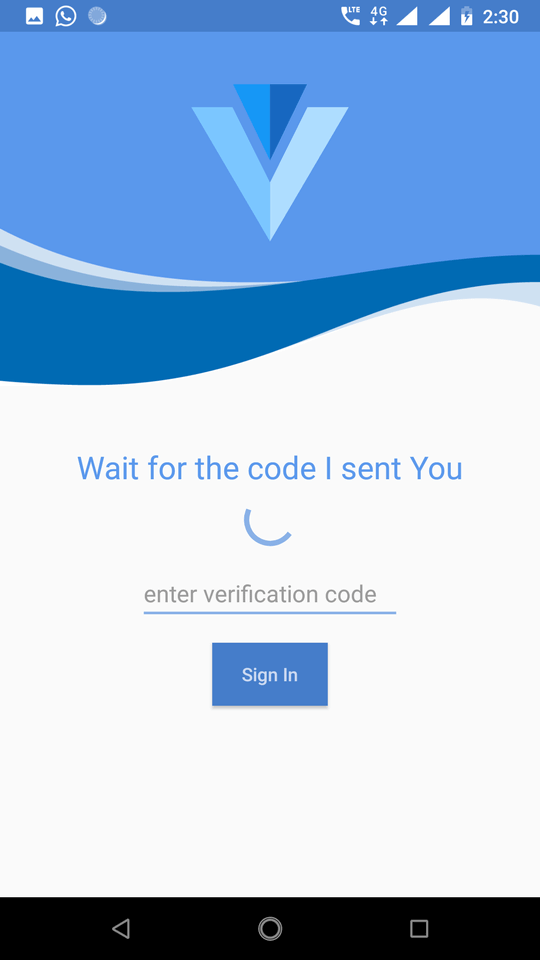
Sau đó tạo một một layout cho nó, mình đặt file layout có tên là activity_verify_phone.xml
<?xml version="1.0" encoding="utf-8"?>
<RelativeLayout xmlns:android="http://schemas.android.com/apk/res/android"
    xmlns:app="http://schemas.android.com/apk/res-auto"
    xmlns:tools="http://schemas.android.com/tools"
    android:layout_width="match_parent"
    android:layout_height="match_parent"
    tools:context=".VerifyPhoneActivity">

    <RelativeLayout
        android:id="@+id/relativeLayout"
        android:layout_width="match_parent"
        android:layout_height="200dp"
        android:background="@color/colorPrimary"
        android:orientation="horizontal">

        <ImageView
            android:layout_width="120dp"
            android:layout_height="120dp"
            android:layout_centerHorizontal="true"
            android:layout_centerVertical="true"
            android:background="@drawable/ic_logo" />

    </RelativeLayout>

    <ImageView
        android:id="@+id/imageView"
        android:layout_width="match_parent"
        android:layout_height="120dp"
        android:layout_below="@id/relativeLayout"
        android:layout_marginTop="-50dp"
        android:background="@drawable/waves" />

    <RelativeLayout
        android:id="@+id/container"
        android:layout_width="match_parent"
        android:layout_height="match_parent"
        android:layout_below="@id/imageView"
        android:orientation="vertical"
        android:padding="20dp">

        <TextView
            android:id="@+id/textView"
            android:layout_width="wrap_content"
            android:layout_height="wrap_content"
            android:layout_centerHorizontal="true"
            android:layout_marginTop="25dp"
            android:text="Wait for the code I sent You"
            android:textAppearance="@style/Base.TextAppearance.AppCompat.Headline"
            android:textColor="@color/colorPrimary" />

        <ProgressBar
            android:id="@+id/progressbar"
            android:layout_below="@id/textView"
            android:layout_centerHorizontal="true"
            android:layout_width="wrap_content"
            android:layout_height="wrap_content" />

        <EditText
            android:id="@+id/editTextCode"
            android:layout_width="200dp"
            android:layout_height="wrap_content"
            android:layout_below="@id/progressbar"
            android:layout_centerHorizontal="true"
            android:layout_marginTop="10dp"
            android:digits="0123456789"
            android:drawablePadding="10dp"
            android:hint="enter verification code"
            android:inputType="phone"
            android:maxLength="10" />

        <Button
            android:id="@+id/buttonSignIn"
            android:layout_width="wrap_content"
            android:layout_height="wrap_content"
            android:layout_below="@id/editTextCode"
            android:layout_centerHorizontal="true"
            android:layout_marginTop="15dp"
            android:background="@color/colorPrimaryDark"
            android:text="Sign In"
            android:textAllCaps="false"
            android:textColor="#cdd8f1" />

    </RelativeLayout>

</RelativeLayout>
Ở bước này, mình chỉ mới tạo layout thôi, chứ chưa hề code cho logic ứng dụng nhé. Cứ bình tĩnh
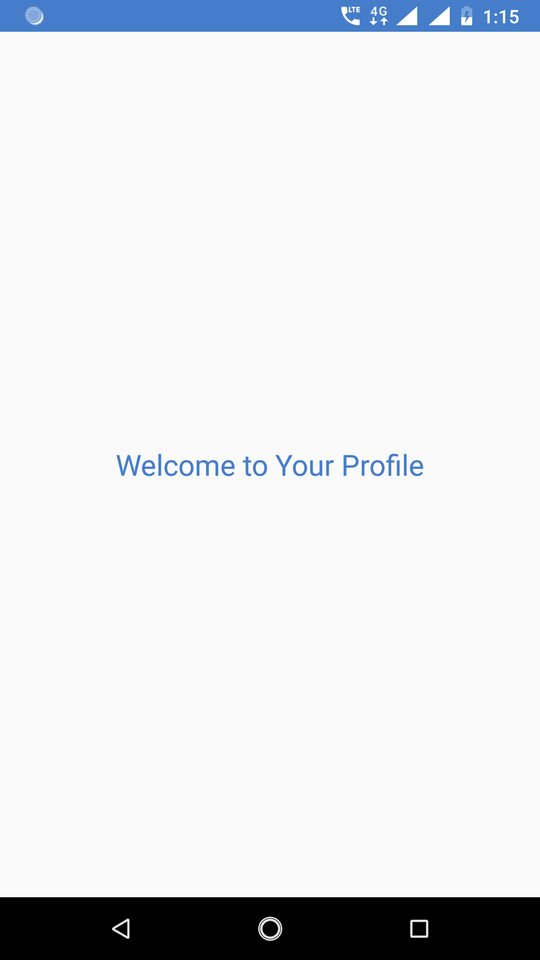
Tạo màn hình Profile
Màn hình mình tạo ra với mục đính duy nhất là chính là thông báo cho người dùng biết đã xác thực số điện thoại thành công.
Như vậy là phần layout đã xong. Chúng ta bắt tay vào code logic cho tính năng xác thực
Lấy số điện thoại được nhập từ người dùng
Quay trở lại MainActivity.java và viết đoạn code sau
findViewById(R.id.buttonContinue).setOnClickListener(new View.OnClickListener() {
    @Override
    public void onClick(View v) {

        String mobile = editTextMobile.getText().toString().trim();

        if(mobile.isEmpty() || mobile.length() < 10){
            editTextMobile.setError("Enter a valid mobile");
            editTextMobile.requestFocus();
            return;
        }

        Intent intent = new Intent(MainActivity.this, VerifyPhoneActivity.class);
        intent.putExtra("mobile", mobile);
        startActivity(intent);
    }
});
Đoạn code trên chỉ đơn giản là lấy số điện thoại từ EditText và gửi nó qua VerifyPhoneActivity bằng Intent
- Đọc thêm: Hướng dẫn sử dụng Intent trong Android
Xác thực số điện thoại
#1. Gửi mã xác thực tới điện thoại
Đây là đoạn mã sử dụng Firebase để gửi mã xác thực, đơn giản chỉ là một dòng code thôi
private void sendVerificationCode(String mobile) {
        PhoneAuthProvider.getInstance().verifyPhoneNumber(
                "+84" + mobile,
                60,
                TimeUnit.SECONDS,
                TaskExecutors.MAIN_THREAD,
                mCallbacks);
    }


    private PhoneAuthProvider.OnVerificationStateChangedCallbacks mCallbacks = new PhoneAuthProvider.OnVerificationStateChangedCallbacks() {
        @Override
        public void onVerificationCompleted(PhoneAuthCredential phoneAuthCredential) {
            //Getting the code sent by SMS
            String code = phoneAuthCredential.getSmsCode();

            //sometime the code is not detected automatically
            //in this case the code will be null
            //so user has to manually enter the code
            if (code != null) {
                editTextCode.setText(code);
                //verifying the code
                verifyVerificationCode(code);
            }
        }

        @Override
        public void onVerificationFailed(FirebaseException e) {
            Toast.makeText(VerifyPhoneActivity.this, e.getMessage(), Toast.LENGTH_LONG).show();
        }

        @Override
        public void onCodeSent(String s, PhoneAuthProvider.ForceResendingToken forceResendingToken) {
            super.onCodeSent(s, forceResendingToken);
            mVerificationId = s;
            mResendToken = forceResendingToken;
        }
    };
Mình sẽ giải thích tác dụng của từng hàm trong đoạn mã trên
sendVerificationCode(): Hàm này có tác dụng gửi mã xác thực. Bạn cần phải điền cả mã quốc gia, ví dụ trên là mã +84 cho Việt Nam. Nhưng thực tế, có thể ứng dụng của bạn hỗ trợ nhiều thị trường quốc gia khác nhau. Nên không nên hard code mã quốc gia, thay vì đó bạn nên thêm một mục lựa chọn quốc gia hoặc để người dùng nhập mã quốc gia.
mCallbacks: Đây là callback để bạn biết là mã code đã được gửi rồi hay chưa. Chúng ta có 3 hàm:
onCodeSent():Hàm này được gọi khi mã code đã được gửi thành công.
onVerificationFailed():Hàm này được gọi khi không gửi được mã code. Chúng ta cần thông báo cho người dùng biết. Ở ví dụ này mình đơn giản là hiển thị một Toast thông báo.onVerificationCompleted():Hàm này được gọi khi bạn xác thực thành công. Tức là mã code nhập vào đúng với mã đã gửi.
#2. Tiến hành xác thực và đăng nhập
Để xác thực, chúng ta sử dụng đoạn code sau. Nếu xác thực thành công thì cho người dùng Sign in vào ứng dụng.
private void verifyVerificationCode(String otp) {
    //creating the credential
    PhoneAuthCredential credential = PhoneAuthProvider.getCredential(mVerificationId, otp);
    //signing the user
    signInWithPhoneAuthCredential(credential);
}
private void signInWithPhoneAuthCredential(PhoneAuthCredential credential) {
    mAuth.signInWithCredential(credential)
            .addOnCompleteListener(VerifyPhoneActivity.this, new OnCompleteListener<AuthResult>() {
                @Override
                public void onComplete(@NonNull Task<AuthResult> task) {
                    if (task.isSuccessful()) {
                        //verification successful we will start the profile activity
                        Intent intent = new Intent(VerifyPhoneActivity.this, ProfileActivity.class);
                        intent.setFlags(Intent.FLAG_ACTIVITY_NEW_TASK | Intent.FLAG_ACTIVITY_CLEAR_TASK);
                        startActivity(intent);
                    } else {
                        //verification unsuccessful.. display an error message
                        String message = "Somthing is wrong, we will fix it soon...";
                        if (task.getException() instanceof FirebaseAuthInvalidCredentialsException) {
                            message = "Invalid code entered...";
                        }
                        Snackbar snackbar = Snackbar.make(findViewById(R.id.parent), message, Snackbar.LENGTH_LONG);
                        snackbar.setAction("Dismiss", new View.OnClickListener() {
                            @Override
                            public void onClick(View v) {
                            }
                        });
                        snackbar.show();
                    }
                }
            });
}
Tất cả chỉ có vậy thôi
Tổng kết
Như vậy mình đã hoàn thành bài viết hướng dẫn xây dựng tính năng xác thực số điện thoại sử dụng Firebase. Nếu bạn vẫn còn khúc mắc thì có thể download toàn bộ source code của bài hướng dẫn tại đây.
Mình hi vọng bài viết sẽ giúp ích cho bạn. Nếu thấy hay thì đừng ngại chia sẻ bài viết cho bạn bè cùng đọc nhé

Nhận sách Java Advanced Features
Java là ngôn ngữ lập trình phổ biến nhất thế giới, là hình mẫu của tư tưởng OOP. Nếu bạn muốn bắt đầu với Java thì đây là cuốn sách không thể bỏ qua. Với 63 ví dụ thực hành, cùng với cách viết ngắn gọn dễ hiểu sẽ giúp bạn hiểu rõ bản chất của Java.
Hiện Amazon đang bán với giá 16$, nhưng với VNTALKING thì miễn phí cho bạn. Còn chờ gì nữa?


 android đúng nhất – không lỗi")


Nếu sử dụng AndroidX thì code này sẽ bị lỗi chạy không được. Rất mong bạn hướng dẫn fixCode nếu sài AndroidX. Cám ơn bạn….
Nếu xác thực thế này thì chỉ là xác thực từ client. Khi xác thực xong ở client thì gửi lên server xác thực lại 1 lần nữa thì mới cho login
Bạn nói cũng có ý đúng.
Nhưng ở bài viết này, việc xác thực phía server (ở đây là Firebase) đã được làm sẵn cho rồi nên mình không cần phải viết code lại nữa bạn à. Firebase họ đã đóng gói và cung cấp thành dịch vụ rồi, mình chỉ việc gọi ra là đc.
Cho mình xin source xác thực số điện thoại làm trên web php nhé. Cảm ơn bạn.
Hi,
Đây là hướng dẫn cho Android mà bạn. Mình kg có mã nguồn bằng PHP bạn à
Đã like nhưng ko hiện
mVerificationId, mResendToken, mAuth là cái j vậy ạ, nó báo đỏ cái đó ạ
Đó là những biến mình dùng để lưu xác thực. Bạn download bộ source code hoàn chỉnh ở trên chứ?
Code để dùng vào việc gì ad
Source code của bài viết này á bạn? Tính năng xác thực số điện thoại có nhiều tình huống trong ứng dụng cần dùng đến mà bạn
Mình đã like rồi vẫn không thấy src code ạ? Mong bạn phản hồi sớm tới mình
Hi bạn Tân,
Mình gửi source code vào email cho bạn rồi nhé. Bạn kiểm tra inbox để lấy link download
Dạ, em cảm ơn anh ạ!! <3
mình like nhưng k hiện src ở đâu a?
Chắc là bị lỗi rùi. Bạn để lại email, mình sẽ gửi source code cho bạn nhé
bạn gửi source mình với nhé, mk cảm ơn
Hi Thịnh,
Mình gửi source code vào email cho bạn rồi nhé.
Cho mình xin Source code nhé. Thanks
[email protected]