

Volley library Android là thư viện networking cho các dự án Android. Volley được dùng để quản lý các network request, giúp cho developer đơn giản hóa việc thực hiện kết nối và xử lý kết quả trả về từ server.
Volley hỗ trợ đầy đủ các HTTP request như GET, POST, PUT, DELETE. Ngoài ra, các thư viện network kiểu như Volley có tính năng network cache rất hữu ích.
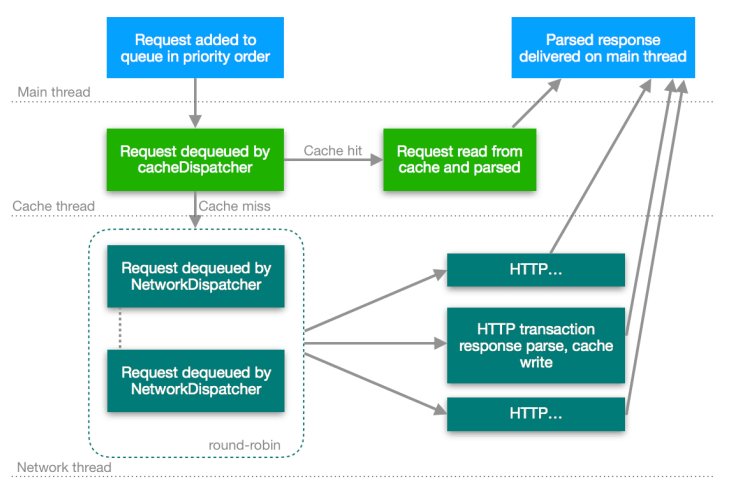
Tất cả request được cache nhằm đảm bảo khi reload, sẽ có kết quả nhanh hơn. Ngoài ra, response được lưu trong memory nên với các response có dữ liệu như JSON, Image, String… thì rất hiệu quả.
Bài viết này mình sẽ hướng dẫn các bạn cách sử dụng thư viện Volley để tạo request tới server, xử lý kết quả trả về là JSON.
Nhưng trước đó thì cùng xem qua các tính năng nổi bật của Volley đã nhé.
Nội dung chính của bài viết
#Volley library Android là gì? Những tính năng nổi bật
Volley là một HTTP library giúp các app Android kết nối mạng đơn giản, developer viết code ít hơn. Đặc biệt là thư viện Volley giúp tăng tốc độ ứng dụng nhờ hỗ trợ cache.
Một số tính năng nổi bật của Volley:
- Hỗ trợ lên schedule để tạo request
- Cho phép cùng lúc thực hiện nhiều request trên các thread khác nhau theo độ ưu tiên.
- Cache trên Disk hay RAM
- Cho phép hủy một request.
- Dễ dàng tùy chỉnh cho phù hợp với yêu cầu của ứng dụng. Như thiết lập retry, back off.
- Dễ debug.
Ngoài Volley ra thì mình còn biết một thư viện Networking Android cũng rất mạnh mẽ và phổ biến khác nữa, đó là Retrofit. Nếu có hứng thú với Retrofit, bạn đọc thêm tại đây: Kết nối rest API bằng Retrofit trong Android
Để các bạn dễ dàng tiếp cận và biết cách sử dụng thư viện này, chúng ta sẽ cùng nhau thực hành cách sử dụng Volley nhé.
Dự án ví dụ sẽ là: Tạo request tới Rest API của github, parse kết quả trả về và hiển thị ra màn hình.
#Sử dụng thư viện Volley library Android
Đầu tiên, các bạn tạo một dự án với Android studio nhé. Cách thực hiện thì mình đã có bài viết hướng dẫn chi tiết rồi. Mời bạn đọc lại tại đây: Tạo dự án mới trong Android Studio
Bước tiếp theo là thêm dependencies vào build.gradle
dependencies {
    ...
    compile 'com.android.volley:volley:1.1.0'
}
Bạn cũng cần phải thêm permission INTERNET vào manifest nhé (permission này không cần phải tạo request run time tới người dùng).
<manifest>
   ....
   <uses-permission android:name="android.permission.INTERNET" />
</manifest>
Như mình đã nói ở trên, mình sẽ tạo request tới API của Github: https://api.github.com/search/users?q=vntalking
Nếu bạn thử paste link trên vào trình duyệt thì sẽ thấy kết quả như dưới đây:
{
  "total_count": 1,
  "incomplete_results": false,
  "items": [
    {
      "login": "vntalking",
      "id": 48328470,
      "node_id": "MDQ6VXNlcjQ4MzI4NDcw",
      "avatar_url": "https://avatars1.githubusercontent.com/u/48328470?v=4",
      "gravatar_id": "",
      "url": "https://api.github.com/users/vntalking",
      "html_url": "https://github.com/vntalking",
      "followers_url": "https://api.github.com/users/vntalking/followers",
      "following_url": "https://api.github.com/users/vntalking/following{/other_user}",
      "gists_url": "https://api.github.com/users/vntalking/gists{/gist_id}",
      "starred_url": "https://api.github.com/users/vntalking/starred{/owner}{/repo}",
      "subscriptions_url": "https://api.github.com/users/vntalking/subscriptions",
      "organizations_url": "https://api.github.com/users/vntalking/orgs",
      "repos_url": "https://api.github.com/users/vntalking/repos",
      "events_url": "https://api.github.com/users/vntalking/events{/privacy}",
      "received_events_url": "https://api.github.com/users/vntalking/received_events",
      "type": "User",
      "site_admin": false,
      "score": 494.33417
    }
  ]
}
Tạo layout cho ứng dụng. Để cho đơn giản, mình sẽ chỉ tạo một TextView để hiển thị kết quả parse được từ response.
<?xml version="1.0" encoding="utf-8"?>
<android.support.constraint.ConstraintLayout xmlns:android="http://schemas.android.com/apk/res/android"
    xmlns:app="http://schemas.android.com/apk/res-auto"
    xmlns:tools="http://schemas.android.com/tools"
    android:layout_width="match_parent"
    android:layout_height="match_parent"
    tools:context="in.eyehunt.volleyandroidsimplerequest.MainActivity">

    <TextView
        android:textColor="@color/colorPrimary"
        android:textAllCaps="true"
        android:id="@+id/tv_users"
        android:layout_width="wrap_content"
        android:layout_height="wrap_content"
        android:layout_marginTop="8dp"
        android:text="Hello World!"
        android:textSize="16sp"
        app:layout_constraintBottom_toBottomOf="parent"
        app:layout_constraintHorizontal_bias="0.051"
        app:layout_constraintLeft_toLeftOf="parent"
        app:layout_constraintRight_toRightOf="parent"
        app:layout_constraintTop_toTopOf="parent"
        app:layout_constraintVertical_bias="0.032" />

</android.support.constraint.ConstraintLayout>
Cuối cùng thì tạo một hàm trong Activity như sau:
// function for network call
    fun getUsers() {
        // Instantiate the RequestQueue.
        val queue = Volley.newRequestQueue(this)
        val url: String = "https://api.github.com/search/users?q=vntalking"

        // Request a string response from the provided URL.
        val stringReq = StringRequest(Request.Method.GET, url,
                Response.Listener<String> { response ->

                    var strResp = response.toString()
                    val jsonObj: JSONObject = JSONObject(strResp)
                    val jsonArray: JSONArray = jsonObj.getJSONArray("items")
                    var str_user: String = ""
                    for (i in 0 until jsonArray.length()) {
                        var jsonInner: JSONObject = jsonArray.getJSONObject(i)
                        str_user = str_user + "\n" + jsonInner.get("login")
                    }
                    textView!!.text = "response : $str_user "
                },
                Response.ErrorListener { textView!!.text = "That didn't work!" })
        queue.add(stringReq)
    }
Bạn thử chạy dự án lên thiết bị nhé. Kết quả thu được như sau:
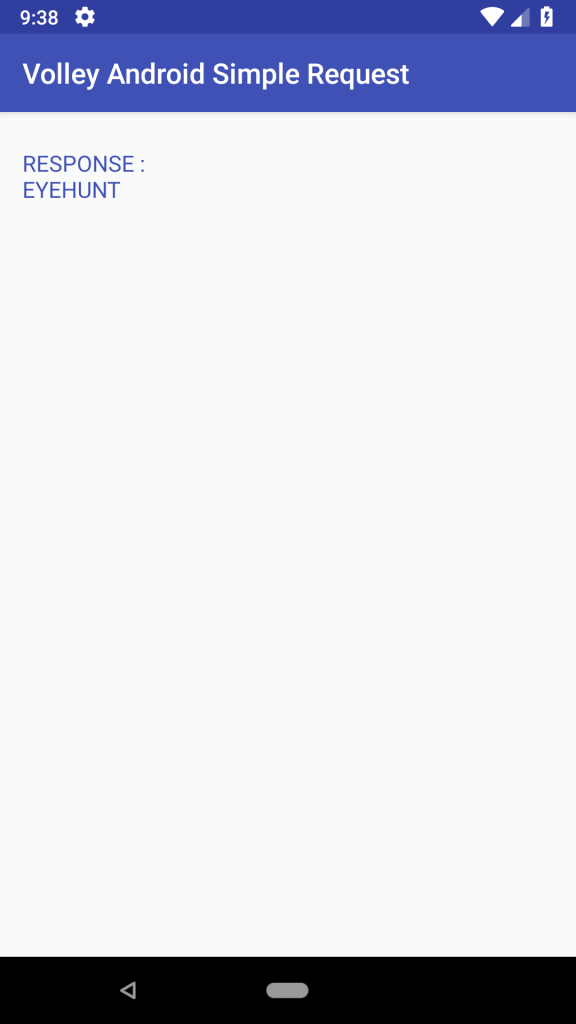
Hehe. Đơn giản quá phải không?
Các bạn có thể download toàn bộ source code của bài viết tại Github.
Mình hi vọng, qua bài viết này, các bạn đã biết cách sử dụng tạo kết nối mạng trong Android với Kotlin.
Đọc thêm các bài viết khác về Android:


 android đúng nhất – không lỗi")


")


")
Bình luận. Cùng nhau thảo luận nhé!